Usage of Kyverno, the Kubernetes Policy Engine
Kyverno is an open source project from Nirmata that was donated to the CNCF. Kyverno is a Kubernetes policy engine with validation and mutation capabilities, but it also has the ability to generate resources and add API object querying capabilities. Kyverno was originally written for Kubernetes, and in addition to its object generation capabilities, it can write policies without a specialized language.
Similarly, Kyverno runs as a dynamic admission controller in Kubernetes clusters. Kyverno receives validation and mutation admission webhook HTTP callbacks from the kube-apiserver and applies matching policies to return the results of executing admission policies or rejecting requests. Kyverno policies can match resources using resource Kind, name, and label selectors, and wildcard characters are supported in the names.
Policy enforcement is captured through Kubernetes events, and Kyverno also reports policy violations for existing resources. The following diagram shows the overall architecture of Kyverno.
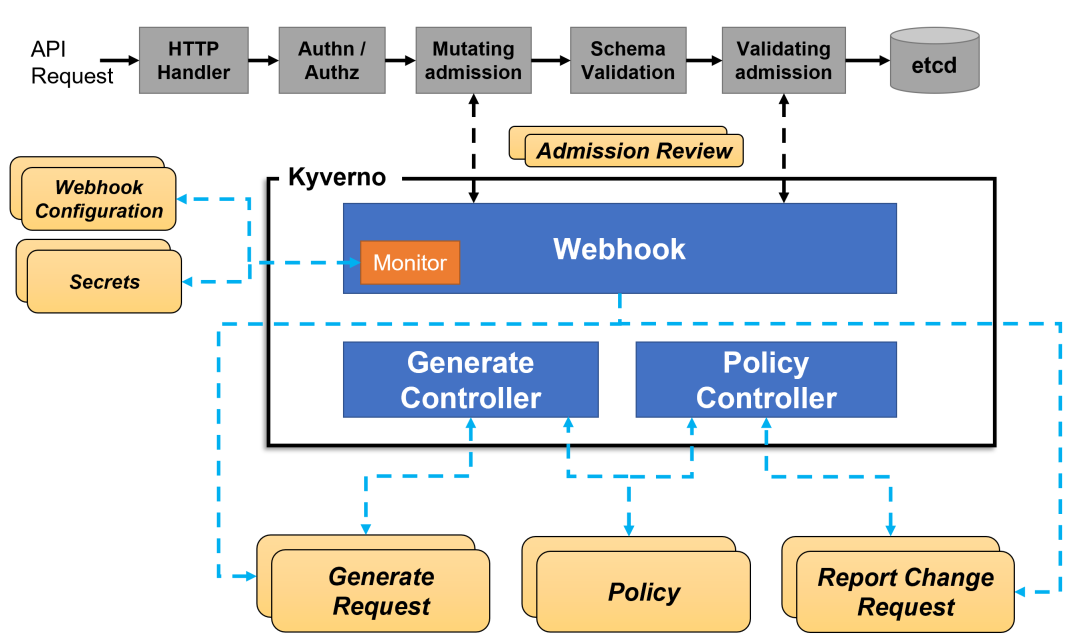
A highly available installation of Kyverno can be accomplished by running multiple replicas, and each replica of Kyverno will have multiple controllers that perform different functions.Webhook handles AdmissionReview requests from the Kubernetes APIServer, and its Monitor component creates and manages the required configuration. The PolicyController watches the policy resource and initiates a background scan based on the configured scan interval, and the GenerateController manages the lifecycle of the generated resource.
Installation
First you need to make sure that your Kubernetes cluster version must be higher than v1.14, and the version to be installed is also related to the Kubernetes version.
| Kyverno Version | Kubernetes Min | Kubernetes Max |
|---|---|---|
| 1.6.x | 1.16 | 1.23 |
| 1.7.x | 1.21 | 1.23 |
| 1.8.x | 1.23 | 1.25 |
| 1.9.x | 1.24 | 1.26 |
| 1.10.x | 1.24 | 1.26 |
We’re already at version v1.26.x here, so just choose to install version 1.9.2.
You can install Kyverno directly by executing the following command.
➜ kubectl create -f https://github.com/kyverno/kyverno/releases/download/v1.9.2/install.yaml
It is also possible to use Helm for one-click installations.
➜ helm repo add kyverno https://kyverno.github.io/kyverno/
➜ helm repo update
# Install the Kyverno Helm chart into a new namespace called "kube-kyverno"
➜ helm upgrade --install kyverno kyverno/kyverno -n kube-kyverno --create-namespace
Release "kyverno" does not exist. Installing it now.
NAME: kyverno
LAST DEPLOYED: Tue Apr 11 15:51:30 2023
NAMESPACE: kube-kyverno
STATUS: deployed
REVISION: 1
NOTES:
Chart version: 2.7.2
Kyverno version: v1.9.2

Thank you for installing kyverno! Your release is named kyverno.
⚠️  WARNING: Setting replicas count below 3 means Kyverno is not running in high availability mode.

💡 Note: There is a trade-off when deciding which approach to take regarding Namespace exclusions. Please see the documentation at https://kyverno.io/docs/installation/#security-vs-operability to understand the risks.
The installation creates a kube-kyverno namespace, which also contains some relevant CRDs.
➜ kubectl get pods -n kube-kyverno
NAME                                          READY   STATUS    RESTARTS   AGE
kyverno-8657b8cfcf-mgtsr                      1/1     Running   0          2m25s
kyverno-cleanup-controller-5c964d77dc-5s5zp   1/1     Running   0          2m25s
➜ kubectl get validatingwebhookconfiguration
NAME                                              WEBHOOKS   AGE
kyverno-cleanup-validating-webhook-cfg            1          44m
kyverno-exception-validating-webhook-cfg          1          16m
kyverno-policy-validating-webhook-cfg             1          16m
kyverno-resource-validating-webhook-cfg           0          16m
➜ kubectl get mutatingwebhookconfigurations
NAME                                            WEBHOOKS   AGE
kyverno-policy-mutating-webhook-cfg             1          17m
kyverno-resource-mutating-webhook-cfg           0          17m
kyverno-verify-mutating-webhook-cfg             1          17m
➜ kubectl get crd |grep kyverno
admissionreports.kyverno.io                2023-04-11T07:51:33Z
backgroundscanreports.kyverno.io           2023-04-11T07:51:33Z
cleanuppolicies.kyverno.io                 2023-04-11T07:51:33Z
clusteradmissionreports.kyverno.io         2023-04-11T07:51:33Z
clusterbackgroundscanreports.kyverno.io    2023-04-11T07:51:33Z
clustercleanuppolicies.kyverno.io          2023-04-11T07:51:33Z
clusterpolicies.kyverno.io                 2023-04-11T07:51:34Z
generaterequests.kyverno.io                2023-04-11T07:51:33Z
policies.kyverno.io                        2023-04-11T07:51:34Z
policyexceptions.kyverno.io                2023-04-11T07:51:33Z
updaterequests.kyverno.io                  2023-04-11T07:51:33Z
You can see that several validatingwebhookconfiguration and mutatingwebhookconfigurations objects were created after the installation completed.
Policies and Rules
Using Kyverno is really an application of policies and rules. A Kyverno policy is a collection of rules, each of which consists of a match declaration, an optional exclude declaration, and one of the validate, mutate, generate, or verifyImages declarations, each of which can contain only one validate, mutate, generate, or verifyImages subdeclaration. rule may contain only one validate, mutate, generate, or verifyImages subdeclaration.
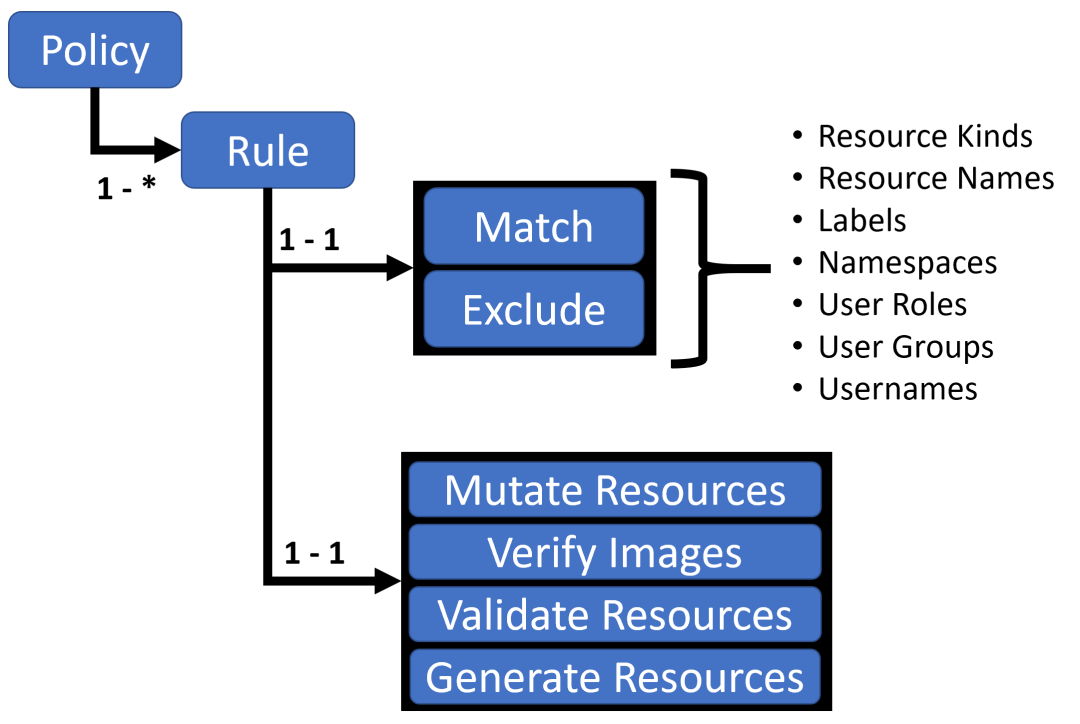
Policies can be defined as cluster-wide resources (ClusterPolicy) or namespace-level resources (Policy).
- Policies will only apply to resources within the namespace in which they are defined
- ClusterPolicy for matching resources across all namespaces
Policy Definitions
Writing a policy is really about defining a Policy or ClusterPolicy object.
Validating Resources
Validation rules are basically the most common and practical type of rules we use. When a user or process creates a new resource, Kyverno will check the properties of that resource against the validation rule and if the validation passes, the creation of the resource is allowed. If the validation fails, the creation is blocked. For example, let’s now add a policy that requires all pods to contain a kyverno label.
# kyverno-require-label.yaml
apiVersion: kyverno.io/v1
kind: ClusterPolicy
metadata:
  name: require-label-policy
spec:
  validationFailureAction: Enforce
  rules:
    - name: check-for-labels
      match:
        resources:
          kinds:
            - Pod
      validate:
        message: "label 'kyverno' is required"
        pattern:
          metadata:
            labels:
              kyverno: "?*"
The above policy file adds a validationFailureAction=[Audit, Enforce] attribute.
- When in
Auditmode, whenever a resource is created that violates one or more of the rules in the rule set, the admission review request is allowed and the results are added to the report. - When in
Enforcemode, resources are blocked immediately upon creation and are not available in the report.
Then underneath that is a collection of rules defined using the rules attribute, match for the matching resource resource, and validate for the validation method.
Just apply the policy object above directly.
➜ kubectl apply -f kyverno-require-label.yaml
clusterpolicy.kyverno.io/require-label-policy created
➜ kubectl get clusterpolicy
NAME                   BACKGROUND   VALIDATE ACTION   READY   AGE
require-label-policy   true         Enforce           true    4m23s
Now we add a Pod without the label kyverno.
➜ kubectl run busybox --image=busybox:1.28.3  --restart=Never -- sleep 1000000
Error from server: admission webhook "validate.kyverno.svc-fail" denied the request:

policy Pod/default/busybox for resource violation:

require-label-policy:
  check-for-labels: 'validation error: label ''kyverno'' is required. rule check-for-labels
    failed at path /metadata/labels/kyverno/'
You can see the hint that a kyverno label is required, and we can also see how the policy is applied by looking at events.
➜ kubectl get events -A -w
......
for-labels fail: validation error: label 'kyverno' is required. rule autogen-check-for-labels failed at path /spec/template/metadata/labels/kyverno/
qdrant-system    51s         Warning   PolicyViolation     pod/qdrant-0                                             policy require-label-policy/check-for-labels fail: validation error: label 'kyverno' is required. rule check-for-labels failed at path /metadata/labels/kyverno/
qdrant-system    50s         Warning   PolicyViolation     statefulset/qdrant
If a Pod is created with a kyverno label, it can be created normally.
➜ kubectl run busybox --image=busybox:1.28.3 --labels kyverno=demo --restart=Never -- sleep 1000000
pod/busybox created
If we change the value of validationFailureAction to Audit, then even if the Pod we create does not have a kyverno label, it can be created successfully, but we can see the corresponding violation report in the PolicyReport object.
➜ kubectl get policyreports
NAME                        PASS   FAIL   WARN   ERROR   SKIP   AGE
cpol-require-label-policy   0      1      0      0       0      4m42s
➜ kubectl describe policyreports |grep "Result: \+fail" -B10
  UID:               def28081-aa68-4e96-bb43-fdc73274df00
Results:
  Message:  validation error: label 'kyverno' is required. rule check-for-labels failed at path /metadata/labels/kyverno/
  Policy:   require-label-policy
  Resources:
    API Version:  v1
    Kind:         Pod
    Name:         busybox
    Namespace:    default
    UID:          9667e83d-62a3-4844-b5d7-da127e9cee2c
  Result:         fail
The resource objects that violate the policy can be seen in the reported resources above.
Change rules
Change rules can be used to modify resources that match a rule (e.g., the rule sets the metadata field to be merged with the resource’s metadata), that is, to modify the corresponding resource according to the rule we set.
For example, let’s now add a policy as shown below to label all pods containing nginx mirrors with a label (kyverno=nginx).
# kyverno-mutate-label.yaml
apiVersion: kyverno.io/v1
kind: ClusterPolicy
metadata:
  name: nginx-label-policy
spec:
  rules:
    - name: nginx-label
      match:
        resources:
          kinds:
            - Pod
      mutate:
        patchStrategicMerge:
          metadata:
            labels:
              kyverno: nginx
          spec:
            (containers):
              - (image): "*nginx*" # Container images containing nginx are fine
Apply the above policy object directly.
➜ kubectl apply -f kyverno-mutate-label.yaml
clusterpolicy.kyverno.io/nginx-label-policy created
➜ kubectl get clusterpolicy
NAME                 BACKGROUND   VALIDATE ACTION   READY   AGE
nginx-label-policy   true         Audit             true    6s
Now we’ll create a Pod directly using the nginx image.
➜ kubectl run --image=nginx:1.7.9 nginx
pod/nginx created
➜ kubectl get pod nginx --show-labels
NAME    READY   STATUS    RESTARTS   AGE   LABELS
nginx   1/1     Running   0          11s   kyverno=nginx,run=nginx
You can see that the Pod was created successfully with a kyverno=nginx label included, and since there is a kyverno label, the validation policy above is also passed and can be created normally.
Generating Resources
Generation rules can be used to create other resources when creating a new resource or updating a source, such as creating new RoleBindings or Secrets for namespaces, etc.
For example, if we have a need to synchronize a Secret to another namespace (e.g. TLS keys, image repository authentication information) and it’s too much trouble to copy the Secret manually, we can use Kyverno to create a policy that will help us synchronize the Secret.
For example, if you have a Secret object named regcred in the default namespace that you want to copy to another namespace, if the source Secret changes, it will also synchronize updates to the copied Secret.
# kyverno-generate-secret.yaml
apiVersion: kyverno.io/v1
kind: ClusterPolicy
metadata:
  name: sync-secrets-policy
spec:
  rules:
    - name: sync-image-pull-secret
      match:
        resources:
          kinds:
            - Namespace
      generate: # Generated resource objects
        kind: Secret
        name: regcred
        namespace: "{{request.object.metadata.name}}" # Get target namespace
        synchronize: true
        clone:
          namespace: default
          name: regcred
Start by preparing our Secret object in the default namespace.
➜ kubectl create secret docker-registry regcred --docker-server=DOCKER_REGISTRY_SERVER --docker-username=DOCKER_USER --docker-password=DOCKER_PASSWORD --docker-email=DOCKER_EMAIL
secret/regcred created
Then apply the Synchronization Secret policy above.
➜ kubectl apply -f kyverno-generate-secret.yaml
clusterpolicy.kyverno.io/sync-secrets-policy created
➜ kubectl get clusterpolicy
NAME            BACKGROUND   ACTION    READY
sync-secrets-policy   true         Audit             true    9s
Now we create a new namespace.
➜ kubectl create ns test
namespace/test created
➜ kubectl get secret -n test
NAME      TYPE                             DATA   AGE
regcred   kubernetes.io/dockerconfigjson   1      6s
You can see that there is an additional regcred Secret object in the newly created namespace.
More Kyverno strategies can be found on the official website: https://kyverno.io/policies, where you can filter by strategy type, category, topic, etc. Kyverno strikes a good balance between flexibility, power, and ease of use, and offers a lot of convenience without requiring much learning time. The official website provides a large number of samples for various scenarios, and is well worth using.
For example, we could create a policy as shown below to limit the path values for NGINX Ingress (CVE-2021-25745 security issue, fixed in NGINX Ingress v1.2.0).
apiVersion: kyverno.io/v1
kind: ClusterPolicy
metadata:
  name: restrict-ingress-paths
  annotations:
    policies.kyverno.io/title: Restrict NGINX Ingress path values
    policies.kyverno.io/category: Security, NGINX Ingress
    policies.kyverno.io/severity: high
    policies.kyverno.io/subject: Ingress
    policies.kyverno.io/minversion: "1.6.0"
    kyverno.io/kyverno-version: "1.6.0"
    kyverno.io/kubernetes-version: "1.23"
    policies.kyverno.io/description: >-
      This policy mitigates CVE-2021-25745 by restricting `spec.rules[].http.paths[].path` to safe values.
      Additional paths can be added as required. This issue has been fixed in NGINX Ingress v1.2.0.
      Please refer to the CVE for details.
spec:
  validationFailureAction: enforce
  rules:
    - name: check-paths
      match:
        any:
          - resources:
              kinds:
                - networking.k8s.io/v1/Ingress
      validate:
        message: "spec.rules[].http.paths[].path value is not allowed"
        deny:
          conditions:
            any:
              - key: "{{ request.object.spec.rules[].http.paths[].path.contains(@,'/etc') }}"
                operator: AnyIn
                value: [true]
              - key: "{{ request.object.spec.rules[].http.paths[].path.contains(@,'/var/run/secrets') }}"
                operator: AnyIn
                value: [true]
              - key: "{{ request.object.spec.rules[].http.paths[].path.contains(@,'/root') }}"
                operator: AnyIn
                value: [true]
              - key: "{{ request.object.spec.rules[].http.paths[].path.contains(@,'/var/run/kubernetes/serviceaccount') }}"
                operator: AnyIn
                value: [true]
              - key: "{{ request.object.spec.rules[].http.paths[].path.contains(@,'/etc/kubernetes/admin.conf') }}"
                operator: AnyIn
                value: [true]