A Practical Guide to WebAssembly in Cloud Native
1. Introduction to WebAssembly
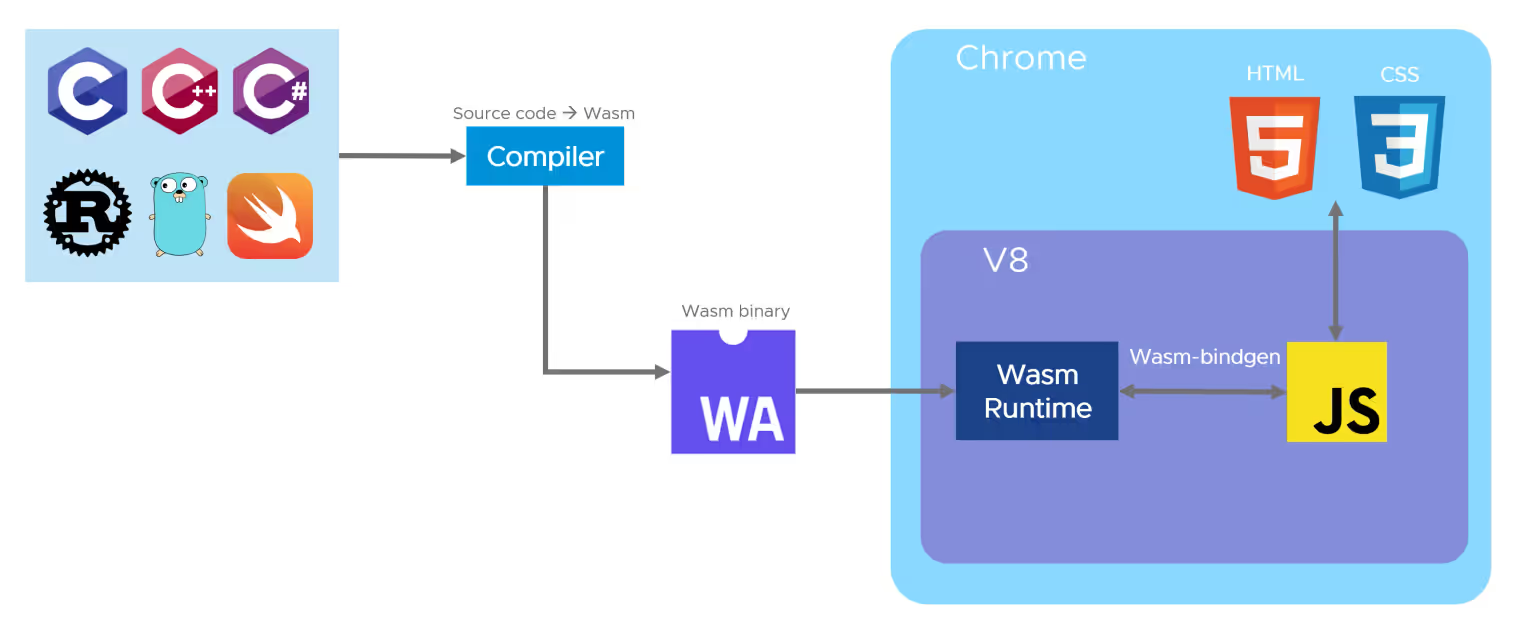
WebAssembly (Wasm) is a general-purpose bytecode technology that compiles program code from other programming languages (e.g. Go, Rust, C/C++, etc.) into bytecode programs that can be executed directly in the browser environment.
One of the original goals of WebAssembly was to solve the performance problems of JavaScript by allowing Web applications to achieve performance similar to native applications. As a generic, open, and efficient abstraction of the underlying VM, many programming languages, such as C, C++, and Rust, allow existing applications to be compiled into Wasm’s object code so that they run in the browser. This decouples application development techniques from runtime technologies and greatly improves code reusability.
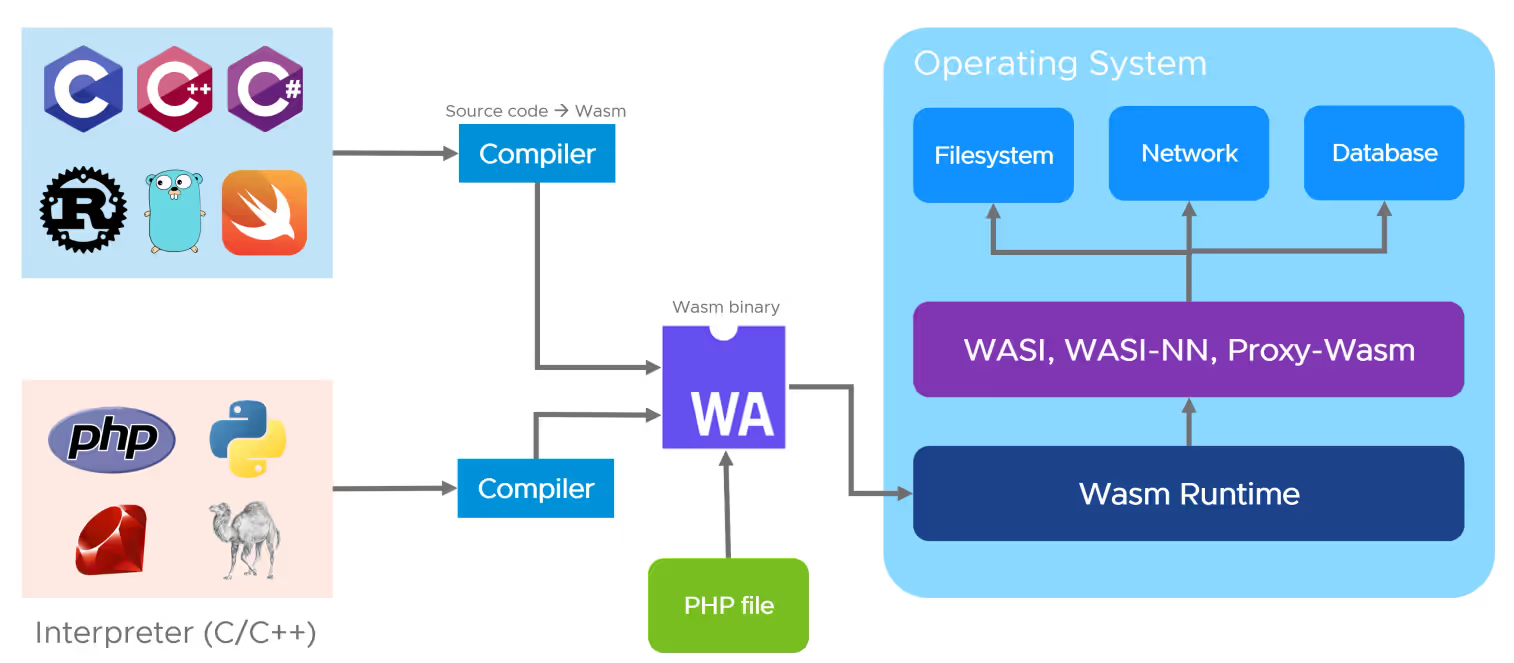
In March 2019, Mozilla introduced the WebAssembly System Interface (Wasi) to standardize the abstraction of interactions between WebAssembly applications and system resources, such as filesystem access, memory management, and network connections, similar to standard APIs such as POSIX.The emergence of the Wasi specification has greatly expanded the number of The emergence of the Wasi specification has greatly expanded the application scenarios for WebAssembly, allowing Wasm to run not only in the browser, but also on the server side. At the same time, platform developers can provide different implementations of the Wasi interface for specific operating systems and environments, allowing cross-platform WebAssembly applications to run on different devices and operating systems.
2 Will WebAssembly replace containers?
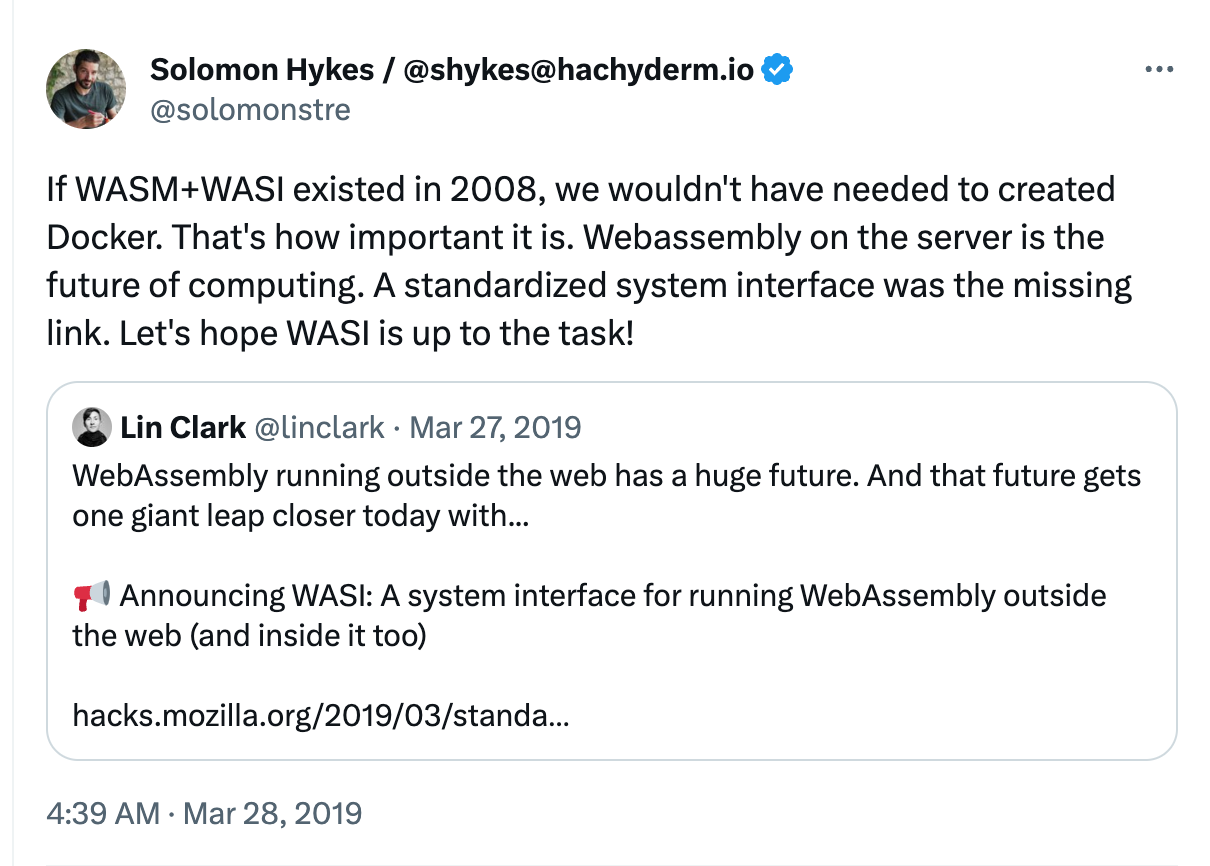
Solomon Hykes, founder of Docker, had this to say about WASI:
If WASM+WASI had existed in 2008, we wouldn’t have needed to create Docker. That’s how important it is. WebAssembly on servers is the future of computing.
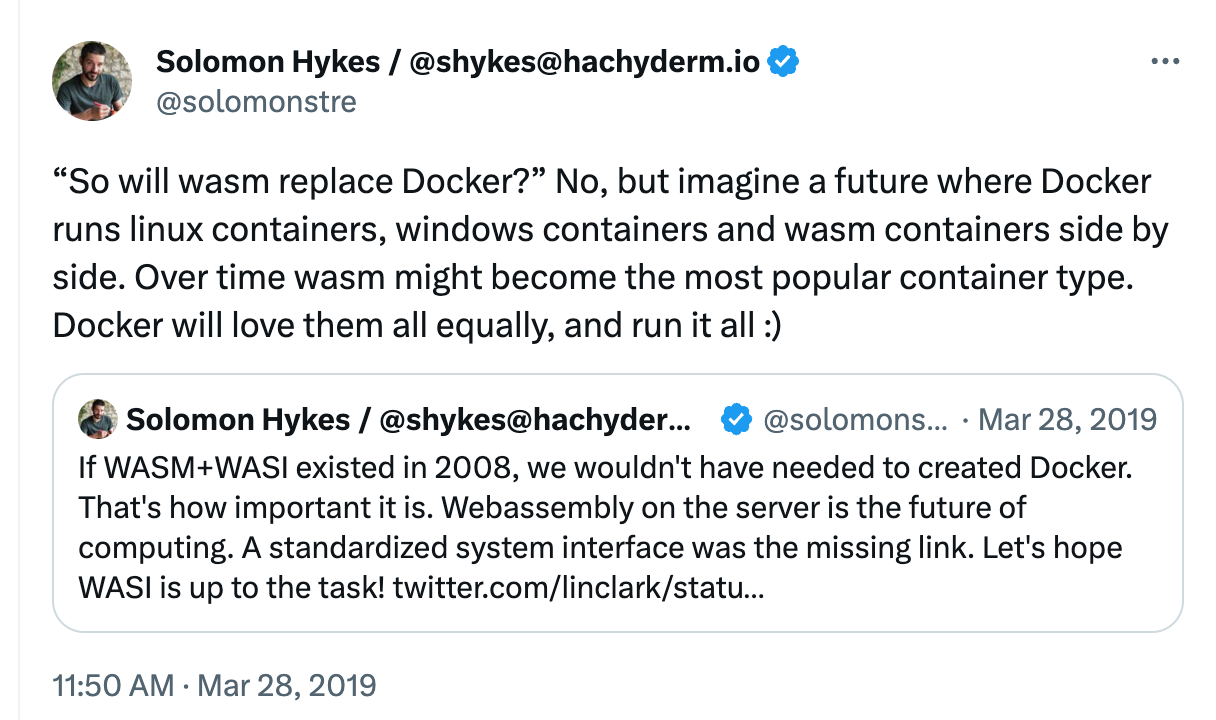
Solomon Hykes followed up with a tweet stating that WebAssembly will work with containers, not replace them.WebAssembly can be a container type, similar to Linux containers or Windows containers. It will become the standard cross-platform application distribution and runtime environment.
3 Advantages of WebAssembly
WebAssembly has a number of significant advantages over traditional containers:
-
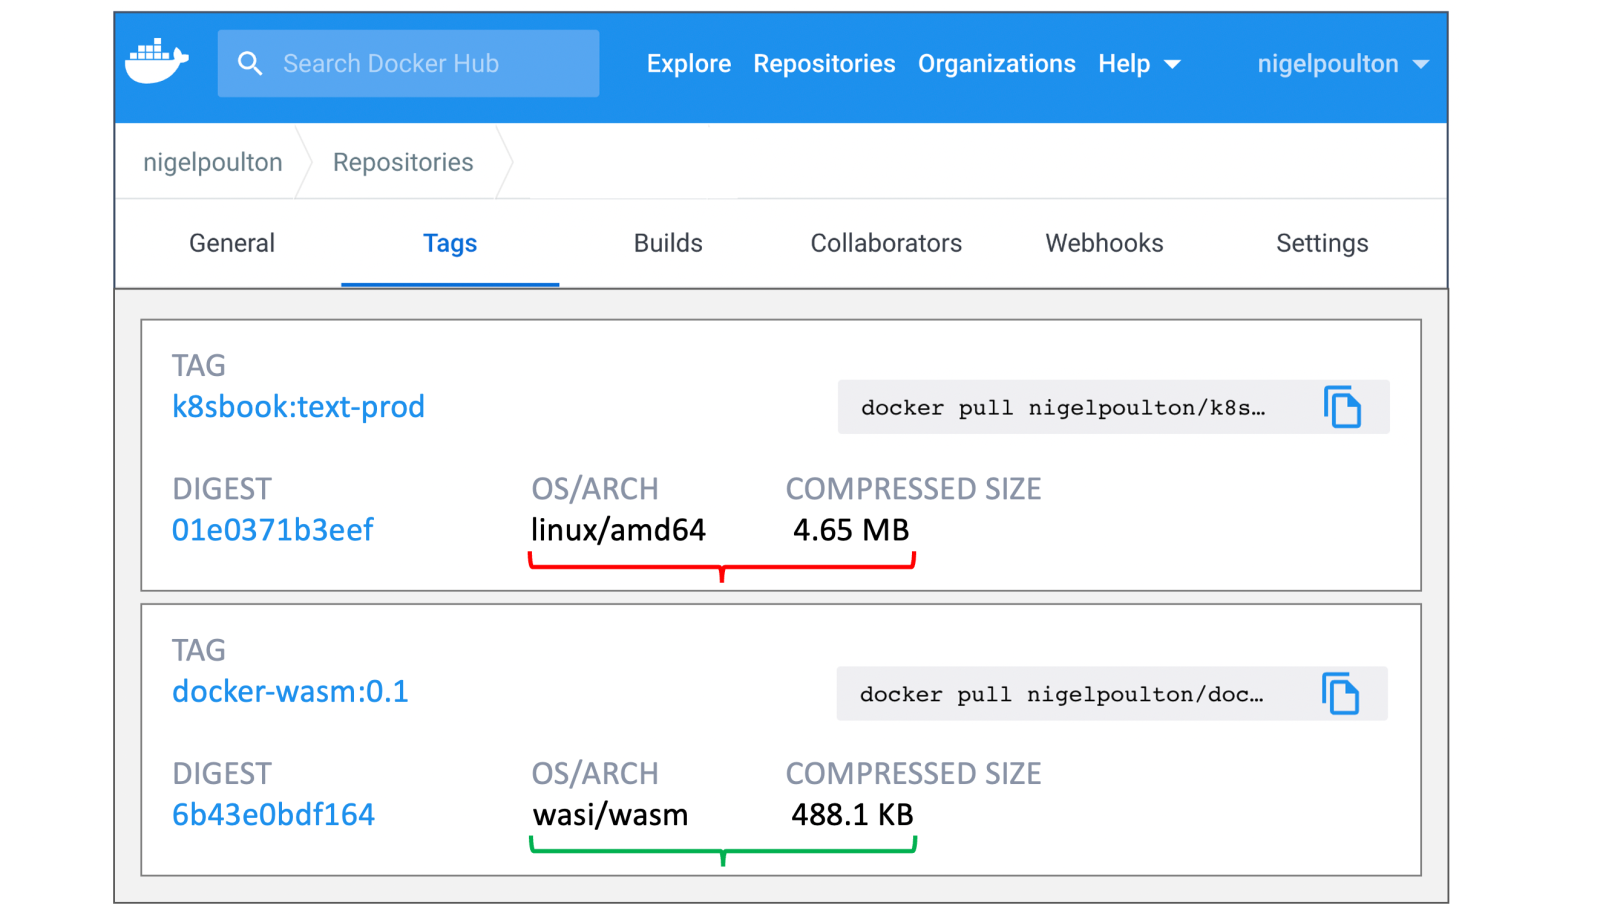
Smaller size: WebAssembly applications are smaller than containers. Below are two simple applications for outputting documents, both built using standard tools, and as you can see from the graph below, the Wasm application is nearly 10 times smaller than the containerized application.
-
Faster: WebAssembly applications can be launched up to 1000 times faster than containers, and you can execute your application’s first command in less than a millisecond, sometimes down to microseconds. This will make it much easier to build scalable applications that scale quickly when requests peak, and that don’t waste CPU or memory when requests drop to zero and there is no traffic.
-
More Secure: WebAssembly runs in a sandbox environment with strong security. It provides a number of security features, such as memory isolation, type checking and resource restrictions, to prevent malicious code execution and access to sensitive information. Better portability: The architecture of containers limits their portability. For example, a container built for linux/amd64 will not run on linux/arm64, nor will it run on windows/amd64 or windows/arm64. This means that organizations need to create and maintain multiple images of the same application for different operating systems and CPU architectures. WebAssembly solves this problem by creating a single Wasm module that runs anywhere. Build the wasm32/wasi application once, and the Wasm runtime on any host can execute it. This means that WebAssembly fulfills the promise of build once, run everywhere, eliminating the need to build and maintain multiple images for different operating systems and CPU architectures.
For a detailed comparison of WebAssembly and containers, check out this table: WebAssembly vs Linux Container.
4 Developing Wasm Applications with Rust
Whether or not an application can be compiled to Wasm depends greatly on the programming language used. Languages such as Rust, C, and C++ have good support for Wasm. As of Go version 1.21, Wasi is also officially supported by Go, which previously required a third-party tool such as tinygo to compile. Rust’s first-class support for Wasm and its GC-free, zero-runtime-overhead features make it an ideal choice for developing Wasm applications. Therefore, in this paper, Rust is chosen to develop Wasm applications.
4.1 Installing Rust
Execute the following command to install rustup and install the latest stable version of Rust via rustup, a command-line tool for managing Rust versions and toolchains.
curl --proto '=https' --tlsv1.2 -sSf https://sh.rustup.rs | sh
4.2 Adding the wasm32-wasi build target to Rust
As mentioned earlier, Wasi (WebAssembly System Interface) is a system-level interface for WebAssembly, designed to enable WebAssembly to interact with the host system in different environments. It provides a standardized way for WebAssembly to access system-level functions such as file I/O, network operations and system calls.
rustc is a cross-platform compiler, and has many compilation targets, which can be viewed with the rustup target list command. wasm32-wasi is one of the Rust compilation targets, which is used to compile Rust code into Wasm modules that conform to the Wasi standard. By compiling Rust code to the wasm32-wasi target, you can bring the functionality and security of Rust into the WebAssembly environment and use the standardized system interface provided by wasm32-wasi to interact with the host system.
Execute the following command to add the wasm32-wasi target to the Rust compiler.
rustup target add wasm32-wasi
4.3 Writing a Rust Program
Start by building a new Rust project with the following commands.
cargo new http-server
Edit Cargo.toml to add the following dependency. Here we use wrap_wasi to develop a simple HTTP Server. warp_wasi is built on top of the Warp framework, a lightweight web server framework for building high-performance asynchronous web applications.
Code written in the native Warp framework cannot be compiled directly into a Wasm module. So we can use warp_wasi, which allows us to develop web applications in Rust using the Wasi interface.
[dependencies]
tokio_wasi = { version = "1", features = ["rt", "macros", "net", "time", "io-util"]}
warp_wasi = "0.3"
Write a simple HTTP Server that exposes the service on port 8080 and responds Hello, World! when a request is received.
use warp::Filter;

#[tokio::main(flavor = "current_thread")]
async fn main() {
    let hello = warp::get()
        .and(warp::path::end())
        .map(|| "Hello, World!");

    warp::serve(hello).run(([0, 0, 0, 0], 8080)).await;
}
Execute the following command to compile the program as a Wasm module.
cargo build --target wasm32-wasi --release
4.4 Installing WasmEdge
Compiled Wasm modules require a Wasm runtime to run. Common Wasm runtimes include WasmEdge, Wasmtime and Wasmer.
In this case, we choose to use WasmEdge, which is a lightweight, high-performance and extensible WebAssembly Runtime, and run the following command to install WasmEdge.
curl -sSf https://raw.githubusercontent.com/WasmEdge/WasmEdge/master/utils/install.sh | bash
Run the following command to make the installed binaries available in the current session.
source $HOME/.wasmedge/env
4.5 Running the Wasm Module
Use wasmedge to run the previously compiled Wasm module.
wasmedge target/wasm32-wasi/release/http-server.wasm
Access the service locally via the curl command.
curl http://localhost:8080
Hello, World!
5 Running a Wasm Workload
5.1 Running Wasm Workloads in Linux Containers
The easiest way to run Wasm applications in a container ecosystem is to embed the Wasm module directly into a Linux container image. Specifically, we can streamline the Linux operating system inside the container enough to support the Wasmedge runtime, and then run the Wasm module through Wasmedge. Because the Wasm application is packaged in a regular container, it works seamlessly with any container ecosystem. In this way, the memory footprint of the entire Linux operating system and the Wasmedge runtime can be reduced to as little as 4MB.
Compared to the regular Linux operating system, the lite version of the Linux operating system greatly reduces the attack surface. However, this approach still requires a Linux container to be started. Even with a lite Linux operating system, the image size is still 80% of the container size, so there is still a lot of room for optimization.
Next, build a Linux container image based on the Rust code you wrote earlier. First, create a Dockerfile named Dockerfile-wasmedge-slim in the root directory of the http-server project you created earlier, add the compiled Wasm module to the wasmedge-installed slim linux image, and specify that the Wasm module be started with the wasmedge command.
FROM wasmedge/slim-runtime:0.10.1
COPY target/wasm32-wasi/release/http-server.wasm /
CMD ["wasmedge", "--dir", ".:/", "/http-server.wasm"]
Execute the following command to build the container image.
docker build -f Dockerfile-wasmedge-slim -t cr7258/wasm-demo-app:slim .
Start the container.
docker run -itd -p 8080:8080 \
--name wasm-demo-app \
docker.io/cr7258/wasm-demo-app:slim
Access the service locally via the curl command.
curl http://localhost:8080
Hello, World!
5.2 Running Wasm Workloads in a Wasm-Enabled Container Runtime
The previous section described how to run Wasm workloads by embedding the Wasm module directly into Linux containers, which has the advantage of seamlessly integrating with existing environments while enjoying the performance improvements that Wasm brings.
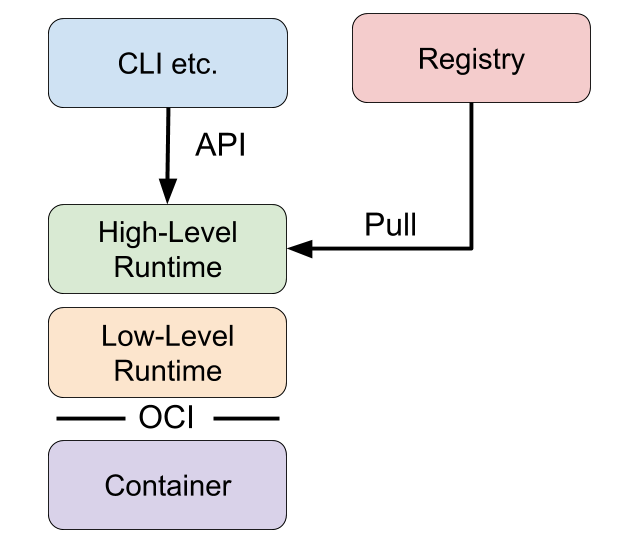
However, the performance and security of this approach is not as good as running a Wasm program directly in a container runtime that supports Wasm. In general, we categorize container runtimes into high-level runtimes and low-level runtimes:
- Low level Container Runtime: Generally refers to an implementation implemented according to the OCI specification that is capable of accepting a runnable filesystem (rootfs) and configuration file (config.json) and running isolated processes. The low-level container runtime is responsible for directly managing and running containers. Common low-level container runtimes include: runc, crun, youki, gvisor, kata, and so on.
- High level Container Runtime (High level Container Runtime): responsible for container image transfer and management, the image will be converted to rootfs and config.json, and will be passed to the low level runtime execution. The high-level container runtime is an abstraction and encapsulation of the low-level container runtime, providing users with a simpler and easier-to-use container management interface and hiding the complexity of the low-level container runtime. Users can use the same high-level container runtime to manage different low-level container runtimes. Common high-level container runtimes are: containerd, cri-o and so on.
Here is a conceptual diagram to help you understand how the high-level and low-level runtimes work together.
The next section describes how to run the Wasm module through the high-level and low-level container runtimes, respectively. First build a Wasm image.
5.2.1 Building an image
Create a Dockerfile in the root directory of the http-server project you created earlier. This time, we’ll build it directly using the scratch empty image, which is the smallest base image reserved in Docker.
FROM scratch
COPY target/wasm32-wasi/release/http-server.wasm /
CMD ["/http-server.wasm"]
Execute the following command to build the container image.
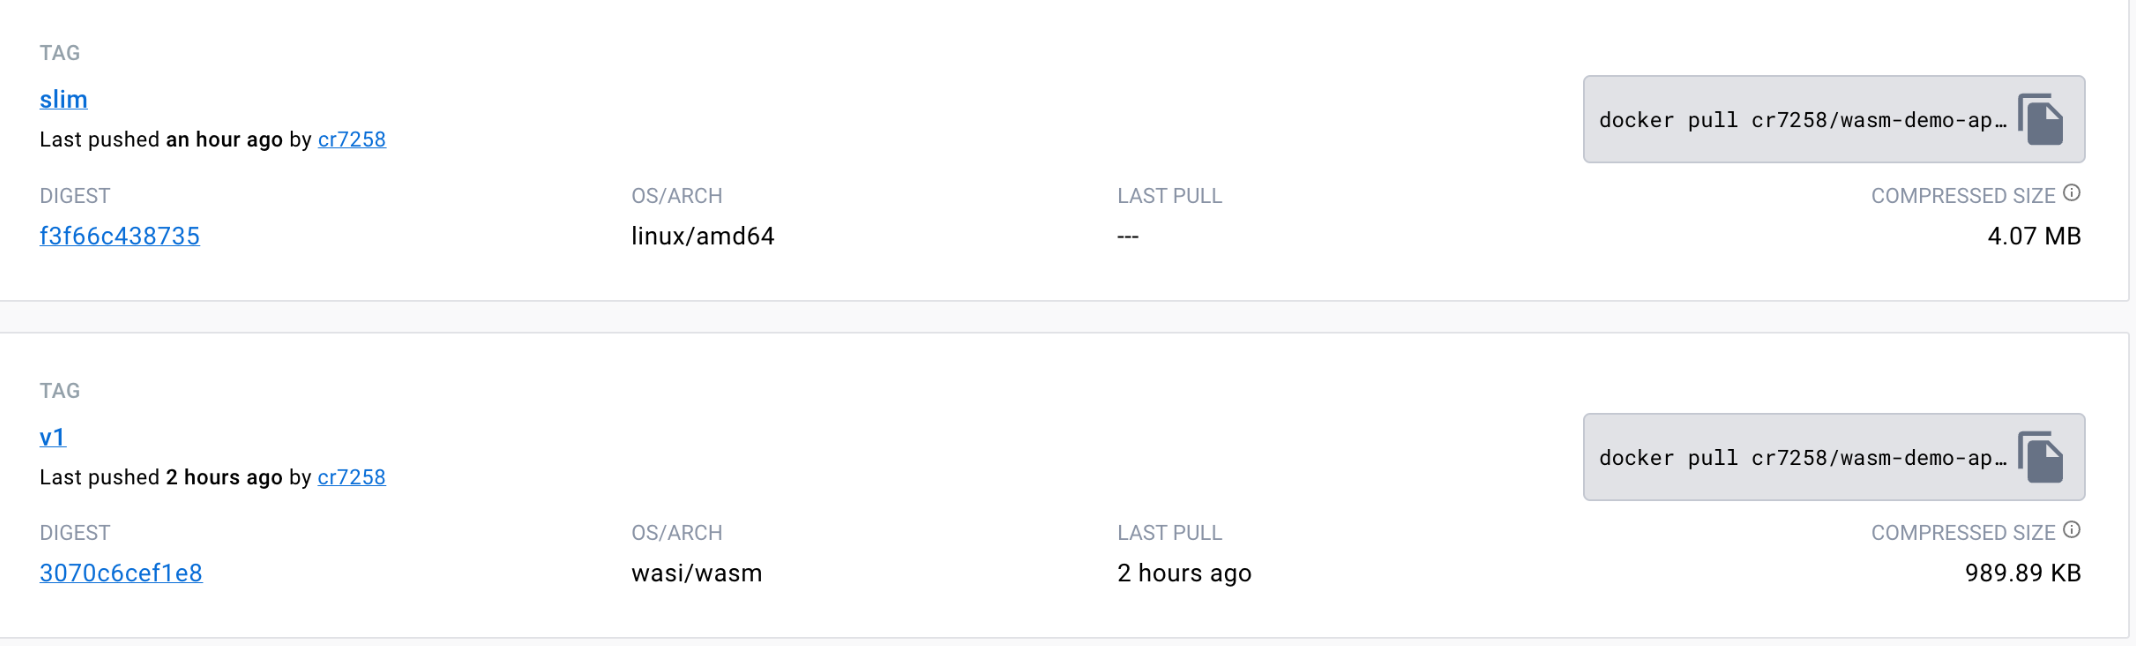
docker build -t docker.io/cr7258/wasm-demo-app:v1 .
Push the image to Docker Hub for subsequent experimental use.
# Logging in to Docker Hub
docker login
# psuh
docker push docker.io/cr7258/wasm-demo-app:v1
You can see on Docker Hub that this build is only 989.89 KB (compressed), which is 1/4 the size of the wasm-demo-app:slim image built earlier.
5.2.2 Low-Level Container Runtimes
In section 5.2.2, we will introduce the use of crun and youki, two low-level container runtimes, to start Wasm applications directly without relying on the high-level container runtime, using the prepared config.json and rootfs files.
5.2.2.1 Crun
crun is a fast and lightweight OCI container runtime written in C with built-in support for WasmEdge. This section demonstrates how to run Wasm modules through crun.
Make sure that WasmEdge is installed as per subsection 4.4..
Then build it from source on an Ubuntu system by executing the following command to install the dependencies needed for compilation.
apt update
apt install -y make git gcc build-essential pkgconf libtool \
     libsystemd-dev libprotobuf-c-dev libcap-dev libseccomp-dev libyajl-dev \
     go-md2man libtool autoconf python3 automake
Next, configure, build and install the crun binaries that support WasmEdge.
git clone https://github.com/containers/crun
cd crun
./autogen.sh
./configure --with-wasmedge
make
make install
Next, run crun -v to check if the installation was successful. If you see +WASM:wasmedge, you have installed WasmEdge in crun.
crun -v

crun version 1.8.5.0.0.0.23-3856
commit: 385654125154075544e83a6227557bfa5b1f8cc5
rundir: /run/crun
spec: 1.0.0
+SYSTEMD +SELINUX +APPARMOR +CAP +SECCOMP +EBPF +WASM:wasmedge +YAJL
Create a directory to hold the files needed to run the container.
mkdir test-crun
cd test-crun
mkdir rootfs
# Copy the compiled Wasm module into the rootfs directory, taking care to replace it with your own directory.
cp ~/hands-on-lab/wasm/runtime/http-server/target/wasm32-wasi/release/http-server.wasm rootfs
Use the crun spec command to generate the default config.json configuration file and then modify it:
- Replace
shwith/http-server.wasmin args. - Add
"module.wasm.image/variant": "compat"to the annotations to indicate that this is a WebAssembly application without guest OS. - Add
"path":"/proc/1/ns/net"to the network namespace to allow the program to share the network namespace with the host for local access.
The configuration file after the modification is as follows:
{
    "ociVersion": "1.0.0",
    "process": {
        "terminal": true,
        "user": {
            "uid": 0,
            "gid": 0
        },
        "args": [
            "/http-server.wasm"
        ],
        "env": [
            "PATH=/usr/local/sbin:/usr/local/bin:/usr/sbin:/usr/bin:/sbin:/bin",
            "TERM=xterm"
        ],
        "cwd": "/",
        "capabilities": {
            "bounding": [
                "CAP_AUDIT_WRITE",
                "CAP_KILL",
                "CAP_NET_BIND_SERVICE"
            ],
            "effective": [
                "CAP_AUDIT_WRITE",
                "CAP_KILL",
                "CAP_NET_BIND_SERVICE"
            ],
            "inheritable": [
            ],
            "permitted": [
                "CAP_AUDIT_WRITE",
                "CAP_KILL",
                "CAP_NET_BIND_SERVICE"
            ],
            "ambient": [
                "CAP_AUDIT_WRITE",
                "CAP_KILL",
                "CAP_NET_BIND_SERVICE"
            ]
        },
        "rlimits": [
            {
                "type": "RLIMIT_NOFILE",
                "hard": 1024,
                "soft": 1024
            }
        ],
        "noNewPrivileges": true
    },
    "root": {
        "path": "rootfs",
        "readonly": true
    },
    "hostname": "crun",
    "mounts": [
        {
            "destination": "/proc",
            "type": "proc",
            "source": "proc"
        },
        {
            "destination": "/dev",
            "type": "tmpfs",
            "source": "tmpfs",
            "options": [
                "nosuid",
                "strictatime",
                "mode=755",
                "size=65536k"
            ]
        },
        {
            "destination": "/dev/pts",
            "type": "devpts",
            "source": "devpts",
            "options": [
                "nosuid",
                "noexec",
                "newinstance",
                "ptmxmode=0666",
                "mode=0620",
                "gid=5"
            ]
        },
        {
            "destination": "/dev/shm",
            "type": "tmpfs",
            "source": "shm",
            "options": [
                "nosuid",
                "noexec",
                "nodev",
                "mode=1777",
                "size=65536k"
            ]
        },
        {
            "destination": "/dev/mqueue",
            "type": "mqueue",
            "source": "mqueue",
            "options": [
                "nosuid",
                "noexec",
                "nodev"
            ]
        },
        {
            "destination": "/sys",
            "type": "sysfs",
            "source": "sysfs",
            "options": [
                "nosuid",
                "noexec",
                "nodev",
                "ro"
            ]
        },
        {
            "destination": "/sys/fs/cgroup",
            "type": "cgroup",
            "source": "cgroup",
            "options": [
                "nosuid",
                "noexec",
                "nodev",
                "relatime",
                "ro"
            ]
        }
    ],
    "annotations": {
        "module.wasm.image/variant": "compat"
    },
    "linux": {
        "resources": {
            "devices": [
                {
                    "allow": false,
                    "access": "rwm"
                }
            ]
        },
        "namespaces": [
            {
                "type": "pid"
            },
            {
                "type": "network",
                "path": "/proc/1/ns/net"
            },
            {
                "type": "ipc"
            },
            {
                "type": "uts"
            },
            {
                "type": "cgroup"
            },
            {
                "type": "mount"
            }
        ],
        "maskedPaths": [
            "/proc/acpi",
            "/proc/asound",
            "/proc/kcore",
            "/proc/keys",
            "/proc/latency_stats",
            "/proc/timer_list",
            "/proc/timer_stats",
            "/proc/sched_debug",
            "/sys/firmware",
            "/proc/scsi"
        ],
        "readonlyPaths": [
            "/proc/bus",
            "/proc/fs",
            "/proc/irq",
            "/proc/sys",
            "/proc/sysrq-trigger"
        ]
    }
}
Start the container with youki.
youki run wasm-demo-app
Access the service locally via the curl command.
curl http://localhost:8080
Hello, World!
If you want to stop and delete the container, you can execute the following command.
youki kill wasm-demo-app SIGKILL
5.2.3 Advanced Container Runtime
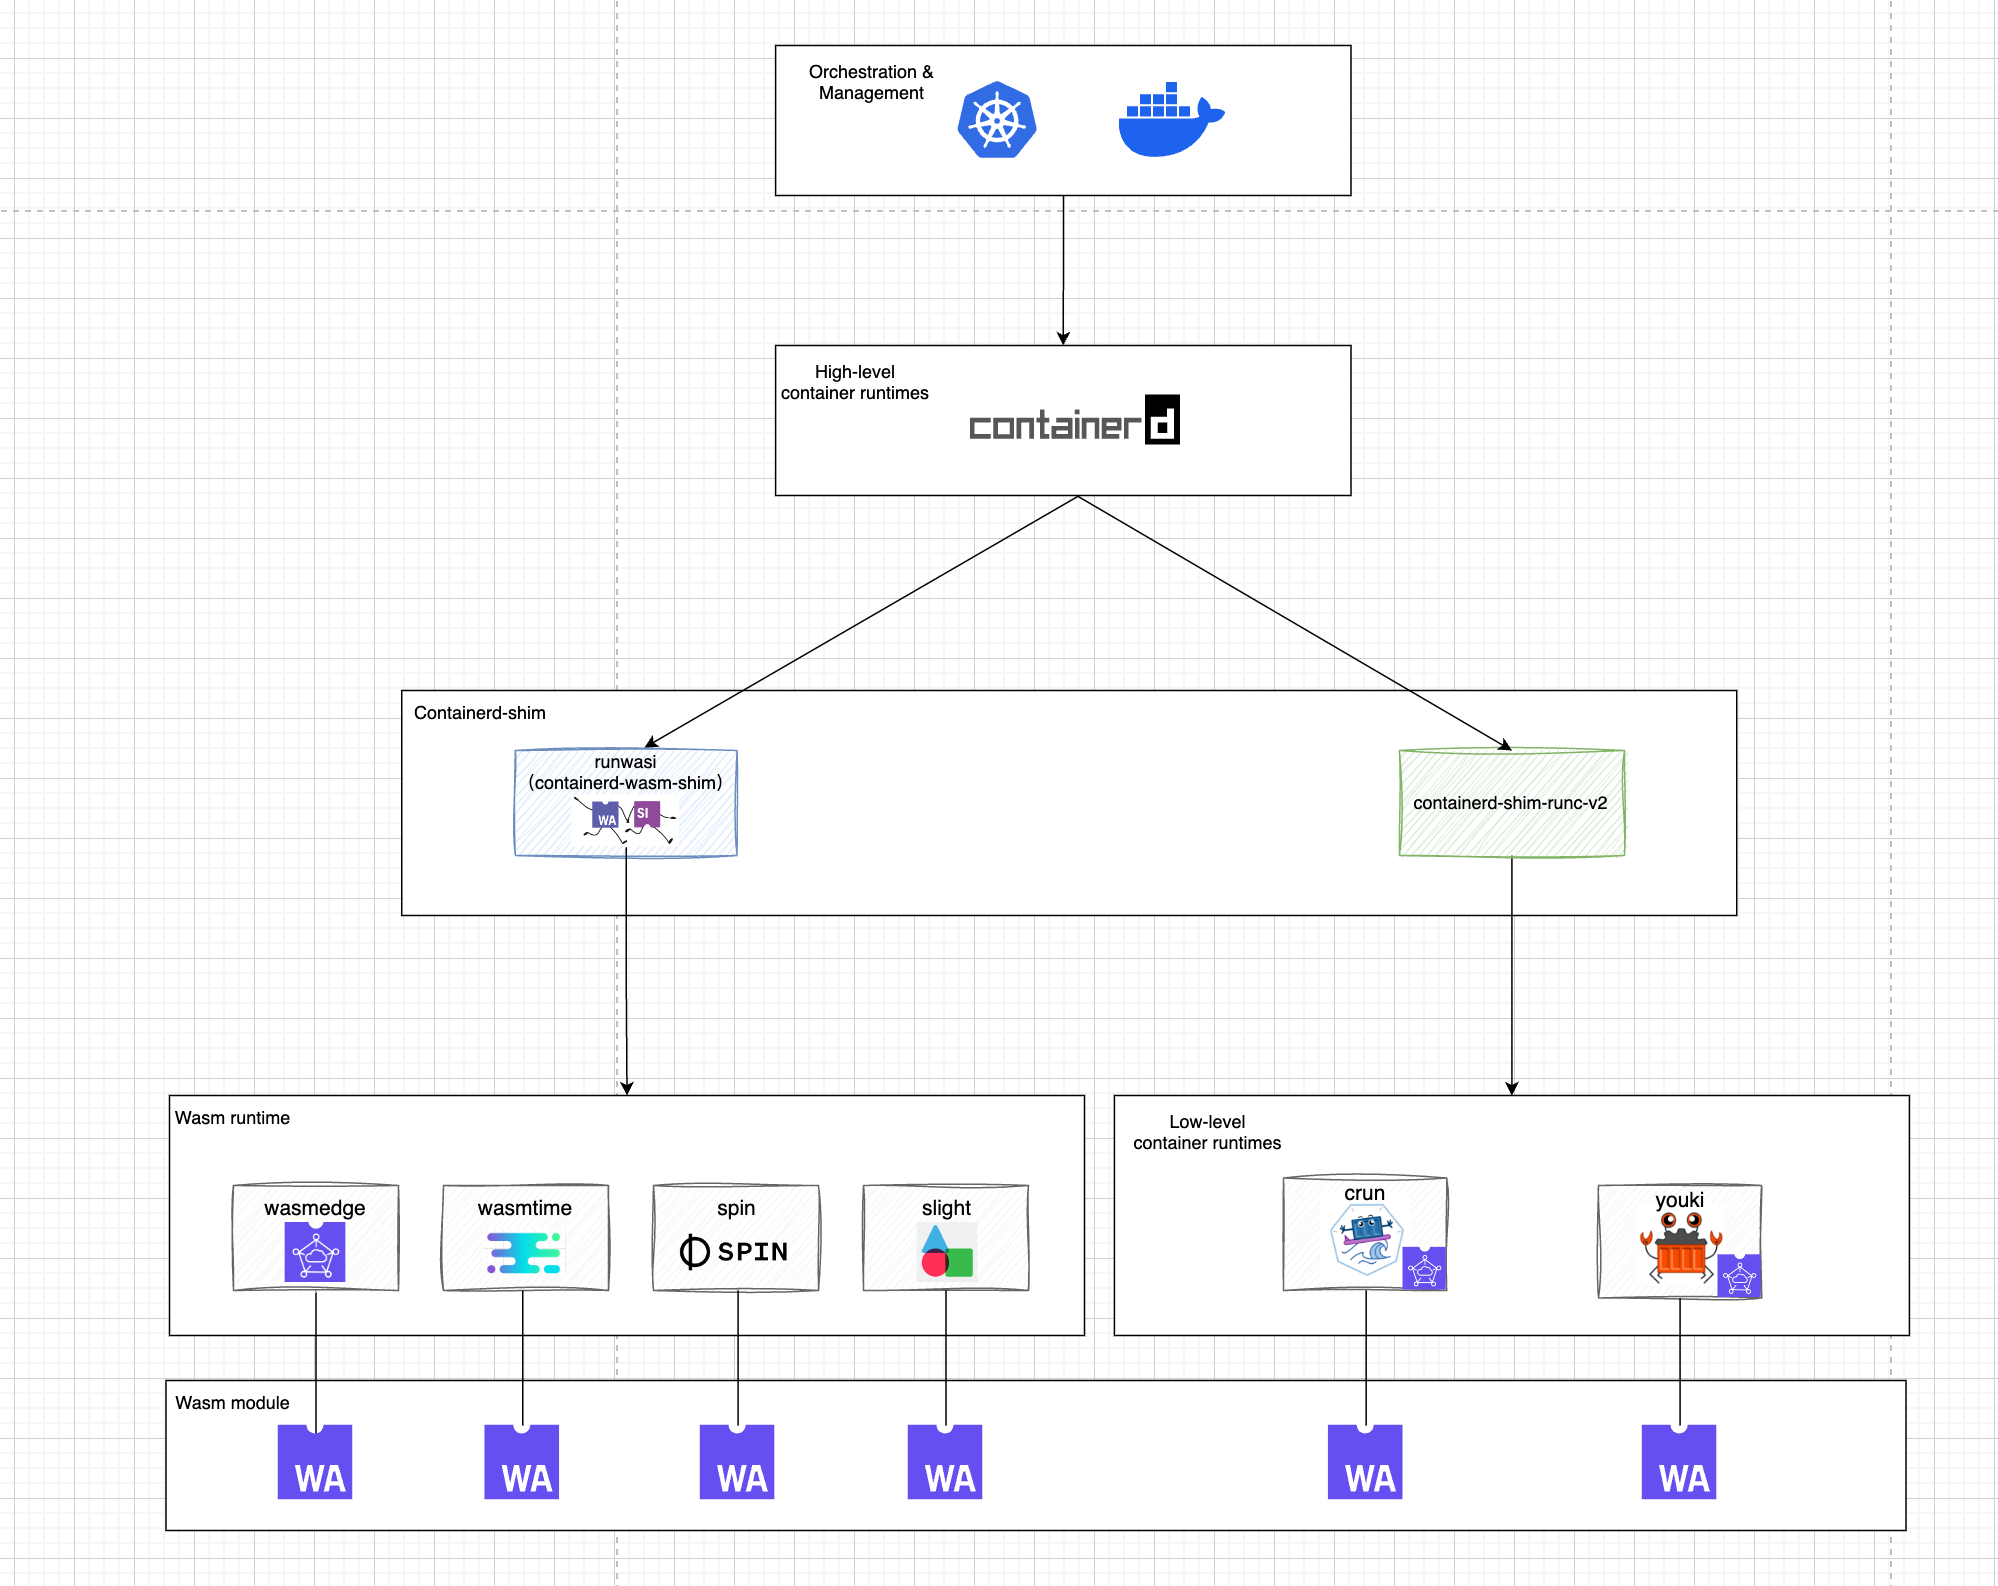
In the advanced container runtime, different shims are used to interface with various low-level container runtimes. In this section, we will use containerd as an example. containerd shims act as a bridge between containerd and the low-level container runtimes, and their main function is to abstract the details of the underlying runtimes so that containerd can manage the various runtimes in a unified way. Two ways containerd manages Wasm workloads are described in Section 5.3.
- containerd uses crun, youki, two different low-level container runtimes that support WasmEdge to manage Wasm modules. (Of course both runtimes can also run regular Linux containers)
- containerd manages Wasm modules directly through the Wasm runtime via containerd-wasm-shim.
5.2.3.1 Containerd + Crun
Make sure that crun is installed according to subsection 5.2.2.1..
Use the following command to install containerd.
export VERSION="1.7.3"
sudo apt install -y libseccomp2
sudo apt install -y wget

wget https://github.com/containerd/containerd/releases/download/v${VERSION}/cri-containerd-cni-${VERSION}-linux-amd64.tar.gz
wget https://github.com/containerd/containerd/releases/download/v${VERSION}/cri-containerd-cni-${VERSION}-linux-amd64.tar.gz.sha256sum
sha256sum --check cri-containerd-cni-${VERSION}-linux-amd64.tar.gz.sha256sum

sudo tar --no-overwrite-dir -C / -xzf cri-containerd-cni-${VERSION}-linux-amd64.tar.gz
sudo systemctl daemon-reload
sudo systemctl start containerd
Then we can run the Wasm program via containerd:
--runc-binary: specifies to use crun to start the container.--runtime: Specify the version and name of shim, which will be converted by containerd to the binary name of shim,io.containerd.runc.v2 -> containerd-shim-runc-v2. containerd will execute the containerd-shim- runc-v2 binary to start shim, and containerd-shim-runc-v2 to call crun to start the container.--label: Add"module.wasm.image/variant": "compat"to indicate that this is a WebAssembly application without guest OS.
# Pull the image first
ctr i pull docker.io/cr7258/wasm-demo-app:v1

# Start the container
ctr run --rm --net-host \
--runc-binary crun \
--runtime io.containerd.runc.v2 \
--label module.wasm.image/variant=compat \
docker.io/cr7258/wasm-demo-app:v1 \
wasm-demo-app
Access the service locally via the curl command.
curl http://localhost:8080
Hello, World!
If you want to stop and delete the container, you can execute the following command.
ctr task kill wasm-demo-app --signal SIGKILL
5.2.3.2 Containerd + Youki
Make sure youki is installed according to subsection 5.2.2.2..
We can run the Wasm program through containerd and specify youki to start the container.
ctr run --rm --net-host \
--runc-binary youki \
--runtime io.containerd.runc.v2 \
--label module.wasm.image/variant=compat \
docker.io/cr7258/wasm-demo-app:v1 wasm-demo-app
Access the service locally via the curl command.
curl http://localhost:8080
Hello, World!
If you want to stop and delete the container, you can execute the following command.
ctr task kill wasm-demo-app --signal SIGKILL
5.2.3.3 Containerd + Runwasi
runwasi is a library written in Rust that is a subproject of containerd. With runwasi, you can write containerd wasm shim to interface with the Wasm runtime and manage Wasm workloads through the Wasm runtime. Currently, there are several containerd wasm shims written in runwasi:
- The runwasi repository contains WasmEdge and Wasmtime implementations of the containerd wasm shim.
- The containerd-wasm-shims repository contains four implementations of containerd wasm shims: Spin, Slight (SpiderLightning), Wasm Workers Server (wws), lunatic.

We’ll run the Wasm application directly using the wasmedge shim provided by runwasi, first cloning the runwasi repository.
git clone https://github.com/containerd/runwasi.git
cd runwasi
Then install the dependencies required for compilation.
sudo apt-get -y install    \
      pkg-config          \
      libsystemd-dev      \
      libdbus-glib-1-dev  \
      build-essential     \
      libelf-dev          \
      libseccomp-dev      \
      libclang-dev        \
      libssl-dev
Execute the following command to compile the file.
make build
sudo make install
We then use containerd to run the Wasm application via the WasmEdge shim:
-
--runtime: Specifies to useio.containerd.wasmedge.v1to run the Wasm application.ctr run --rm --net-host \ --runtime=io.containerd.wasmedge.v1 \ docker.io/cr7258/wasm-demo-app:v1 \ wasm-demo-app
Access the service locally via the curl command.
curl http://localhost:8080
Hello, World!
If you want to stop and delete the container, you can execute the following command.
ctr task kill wasm-demo-app --signal SIGKILL
5.3 Running Wasm Workloads on an Orchestration Platform
5.3.1 Running Wasm on Docker Desktop
Docker Desktop also uses runwasi to support Wasm workloads. To run Wasm workloads in Docker Desktop, make sure that the following two options are checked:
- Use containerd for storing and pulling images
- Enable Wasm
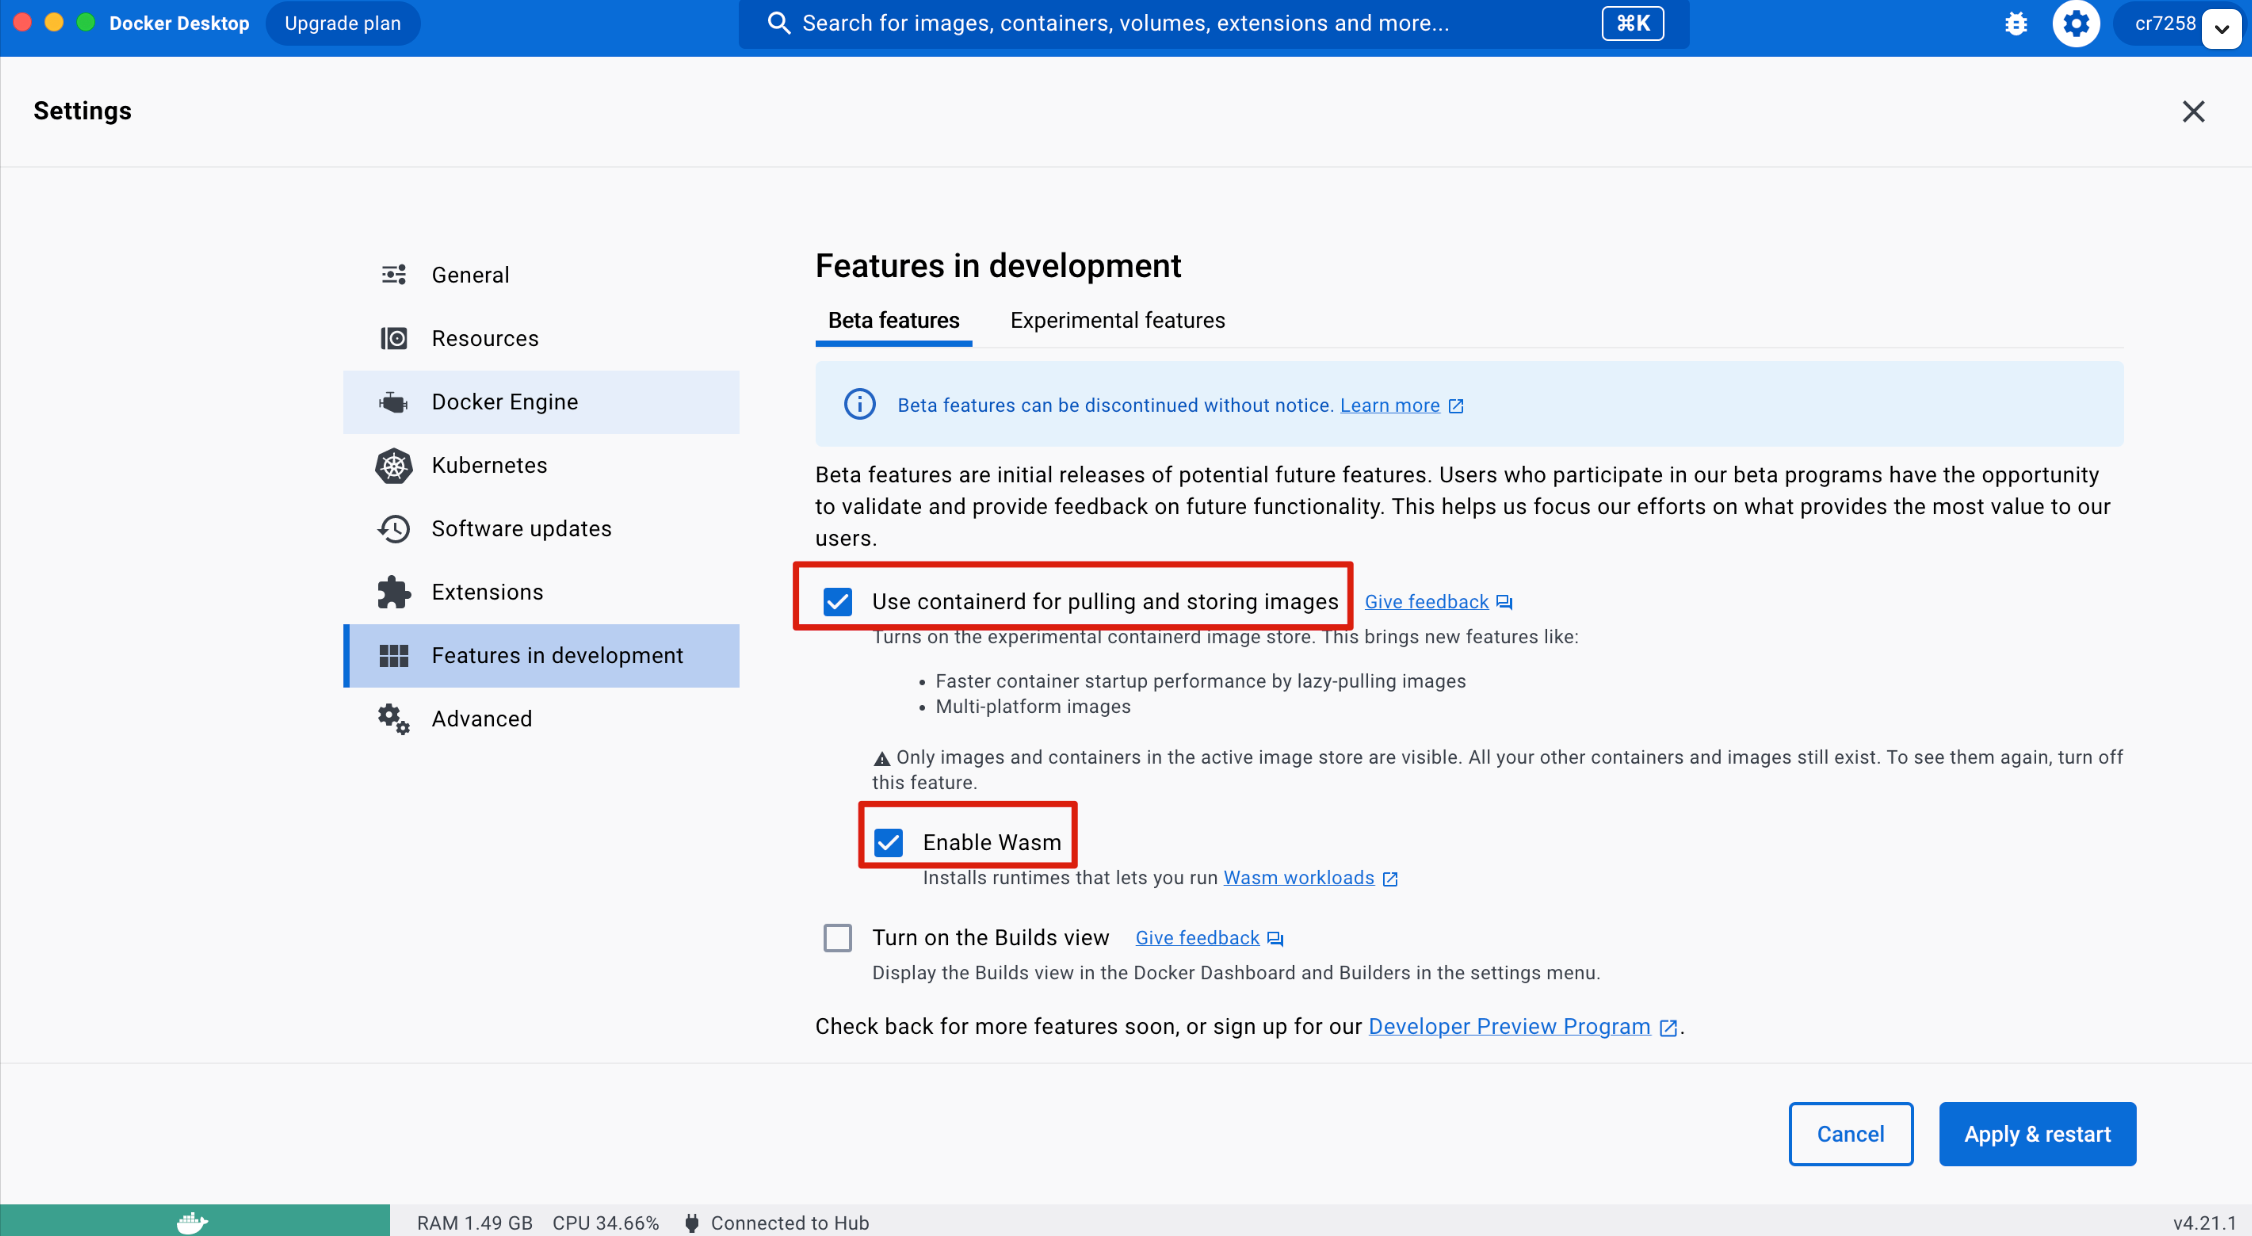
Click Apply & restart to apply the update and Docker Desktop downloads and installs the following runtimes that can be used to run Wasm workloads:
io.containerd.slight.v1io.containerd.spin.v1io.containerd.wasmedge.v1io.containerd.wasmtime.v1
Running a WebAssembly application in Docker is not much different from a normal Linux container, you just need to specify the appropriate Wasm runtime to use via --runtime=io.containerd.wasmedge.v1.
docker run -d -p 8080:8080 \
--name=wasm-demo-app \
--runtime=io.containerd.wasmedge.v1 \
docker.io/cr7258/wasm-demo-app:v1
Access the service locally via the curl command.
curl http://localhost:8080
Hello, World!
If you want to stop and delete the container, you can execute the following command.
docker rm -f wasm-demo-app
5.3.2 Running Wasm Modules in Kubernetes
Kubernetes is the de facto standard in container orchestration, WebAssembly is driving the third wave of cloud computing, and Kubernetes is evolving to take advantage of this.
There are two ways to run Wasm workloads in Kubernetes.
-
First, we need to make the container runtime of the nodes in the cluster support running Wasm workloads. Next, you can dispatch the Pod to a specific node and specify a specific runtime by using RuntimeClass. The handler to run the Wasm workload is specified in the RuntimeClass via the
handlerfield, and can be either a low-level container runtime that supports Wasm (e.g., crun, youki) or a Wasm runtime. We can usescheduling.nodeSelectorto specify nodes with a specific label on which the workload will be scheduled.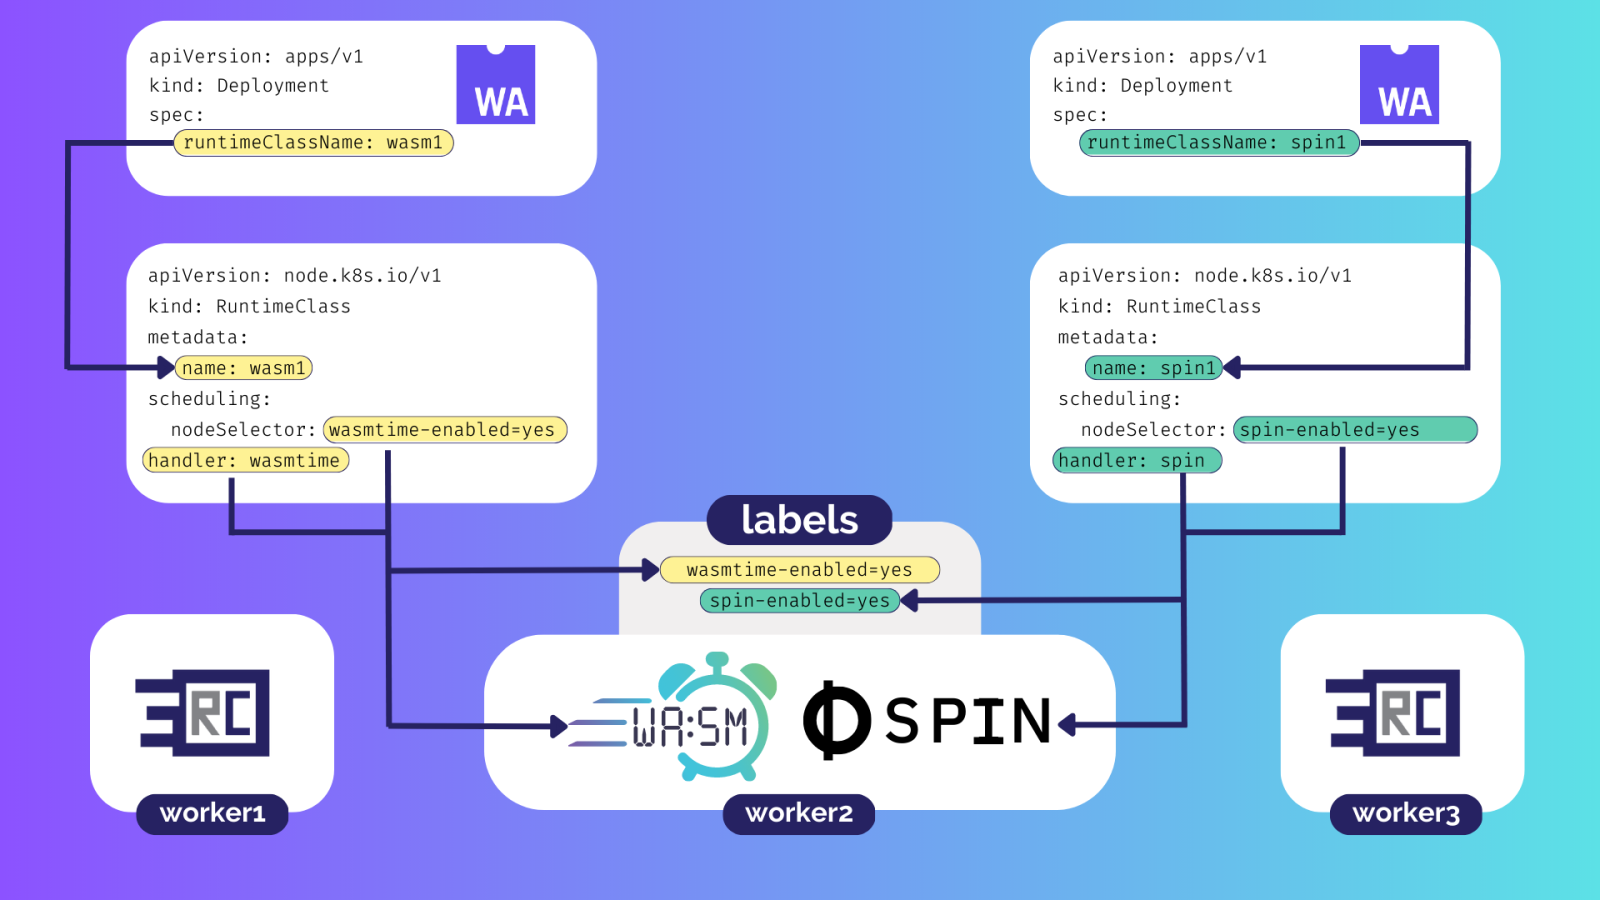
-
A special node (Krustlet) dedicated to running Wasm is added to the cluster, and Wasm workloads are assigned to Krustlet nodes at scheduling time via a label selector.
Kind (Kubernetes in Docker) is a tool for running a local Kubernetes cluster using Docker containers. For the sake of experimentation, you will use Kind to create a Kubernetes cluster in Section 5.3.2. Use the following command to install Kind.
[ $(uname -m) = x86_64 ] && curl -Lo ./kind https://kind.sigs.k8s.io/dl/v0.20.0/kind-linux-amd64
chmod +x ./kind
sudo mv ./kind /usr/local/bin/kind
Kubectl is a command-line tool for managing Kubernetes clusters. Execute the following command to install Kubectl.
curl -LO "https://dl.k8s.io/release/$(curl -L -s https://dl.k8s.io/release/stable.txt)/bin/linux/amd64/kubectl"
chmod +x kubectl
mv kubectl /usr/local/bin/kubectl
5.3.2.1 Kubernetes + Containerd + Crun
Use the following command to create a single-node Kubernetes cluster.
kind create cluster --name wasm-demo
Each Kubernetes Node is a Docker container, which is accessed via the docker exec command.
docker exec -it wasm-demo-control-plane bash
After entering the node, make sure crun is installed according to subsection 5.2.2.1.
Modify the containerd configuration file /etc/containerd/config.toml and add the following to the end of the file.
- Configure crun to act as a runtime handler for containerd in the format
[plugins."io.containerd.grpc.v1.cri".containerd.runtimes.${HANDLER_NAME}]. - The pod_annotations allow passing the Annotation
module.wasm.image/variantset in the Pod metadata to crun, as crun needs this annotation to determine that it is a Wasm workload.
cat >> /etc/containerd/config.toml << EOF
[plugins."io.containerd.grpc.v1.cri".containerd.runtimes.crun]
    runtime_type = "io.containerd.runc.v2"
    pod_annotations = ["module.wasm.image/variant"]
[plugins."io.containerd.grpc.v1.cri".containerd.runtimes.crun.options]
    BinaryName = "crun"
EOF
Then restart containerd.
systemctl restart containerd
Create a RuntimeClass resource named crun and use the crun handler previously set up in containerd. Next, specify the runtimeClassName in the Pod Spec to use that RuntimeClass to tell the kubelet to run the Pod with the specified RuntimeClass. In addition, set the Annotation module.wasm.image/variant: compat to tell crun that this is a Wasm workload.
apiVersion: node.k8s.io/v1
kind: RuntimeClass
metadata:
  name: crun
handler: crun
---
apiVersion: v1
kind: Pod
metadata:
  name: wasm-demo-app
  annotations:
    module.wasm.image/variant: compat
spec:
  runtimeClassName: crun
  containers:
  - name: wasm-demo-app
    image: docker.io/cr7258/wasm-demo-app:v1
Ports can be forwarded locally for access through port-forwarding.
kubectl port-forward pod/wasm-demo-app 8080:8080
Then access the service from another terminal via the curl command.
curl http://localhost:8080
Hello, World!
When the test is complete, destroy the cluster.
kind delete cluster --name wasm-demo
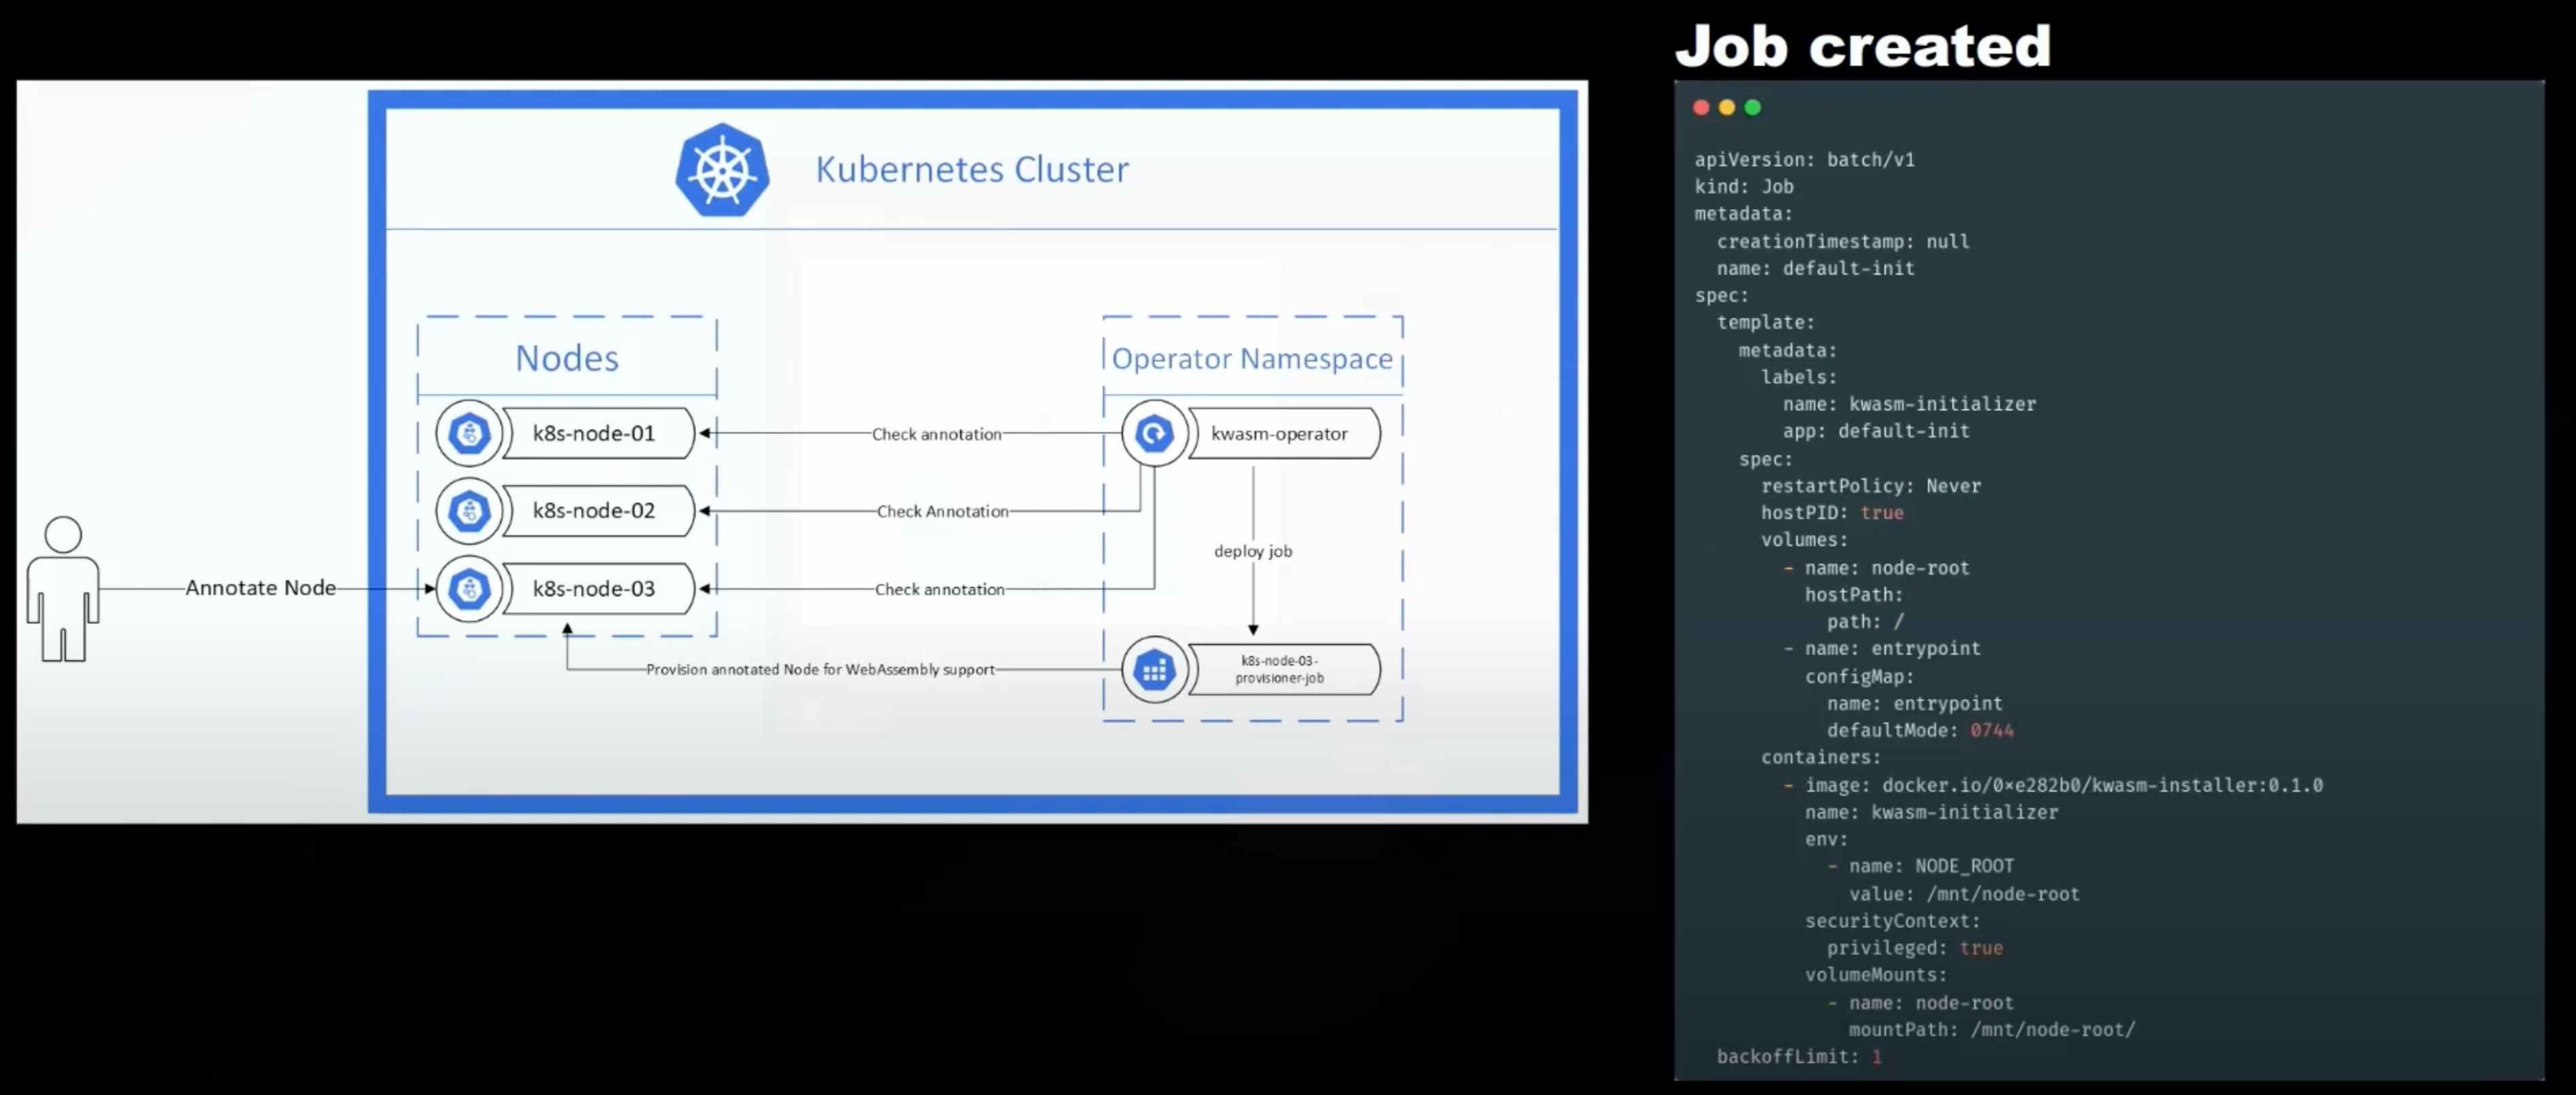
5.3.2.2 KWasm Operator
Kwasm is a Kubernetes Operator that adds WebAssembly support to Kubernetes nodes. When you want to add Wasm support to a node, simply add an Annotation kwasm.sh/kwasm-node=true to the node. Kwasm then automatically creates a Job that deploys the binaries needed to run Wasm on that node and modifies the containerd configuration accordingly.
Use the following command to create a single-node Kubernetes cluster.
kind create cluster --name kwasm-demo
Kwasm provides a Helm chart for users to install, first execute the following command to install Helm.
curl -fsSL -o get_helm.sh https://raw.githubusercontent.com/helm/helm/main/scripts/get-helm-3
chmod 700 get_helm.sh
./get_helm.sh
Then install Kwasm Operator and add Annotation kwasm.sh/kwasm-node=true to all nodes to enable Wasm support.
# Add Helm repo
helm repo add kwasm http://kwasm.sh/kwasm-operator/
# Installation of KWasm operator
helm install -n kwasm --create-namespace kwasm-operator kwasm/kwasm-operator
# Adding Wasm Support to Nodes
kubectl annotate node --all kwasm.sh/kwasm-node=true
Create a RuntimeClass resource named crun and use the crun handler previously set up in containerd. Next, specify the runtimeClassName in the Pod Spec to use that RuntimeClass to tell the kubelet to run the Pod with the specified RuntimeClass. In addition, set the Annotation module.wasm.image/variant: compat to tell crun that this is a Wasm workload.
apiVersion: node.k8s.io/v1
kind: RuntimeClass
metadata:
  name: crun
handler: crun
---
apiVersion: v1
kind: Pod
metadata:
  name: wasm-demo-app
  annotations:
    module.wasm.image/variant: compat
spec:
  runtimeClassName: crun
  containers:
  - name: wasm-demo-app
    image: docker.io/cr7258/wasm-demo-app:v1
After the pod runs successfully, you can forward the port to local access via port-forward.
kubectl port-forward pod/wasm-demo-app 8080:8080
We accessed the service from another terminal via the curl command.
curl http://localhost:8080
Hello, World!
When the test is complete, destroy the cluster.
kind delete cluster --name kwasm-demo
5.3.2.3 Krustlet
Krustlet is a kubelet written in the Rust language that acts as a node in a Kubernetes cluster dedicated to running Wasm workloads. When the Kubernetes scheduler schedules a Pod to a Krustlet node, the Krustlet utilizes the Wasm runtime to start the corresponding Wasm workload. Although the Krustlet project hasn’t been updated in a while, it’s still worth checking out.
Use the following command to create a single-node Kubernetes cluster. The --image parameter specifies that you want to create a Kubernetes cluster for version 1.21.14. Krustlet was last updated last year and may not be compatible with the latest Kubernetes versions. I tested it on the latest Kubernetes cluster and found that Krustlet does not work properly.
kind create cluster --name krustlet-demo --image kindest/node:v1.21.14@sha256:8a4e9bb3f415d2bb81629ce33ef9c76ba514c14d707f9797a01e3216376ba093
Next we need to start a Krustlet node and join it to the cluster. For normal nodes, we can use the kubeadm join command to easily add the node to the cluster. This is because kubeadm does a lot of the work for you, such as generating bootstrap tokens, generating kubelet certificates, and so on.
For Krustlet nodes we need to do this manually, we can use the official Krustlet script. This script creates a bootstrap token for us, which is used by Krustlet to temporarily communicate with the API Server during initialization. The script also generates a temporary Krustlet kubeconfig file based on the token, which is located at console ~/.krustlet/config/kubeconfig by default.
bash <(curl https://raw.githubusercontent.com/krustlet/krustlet/main/scripts/bootstrap.sh)
Next, execute the following command to install the Krustlet binaries.
wget https://krustlet.blob.core.windows.net/releases/krustlet-v1.0.0-alpha.1-linux-amd64.tar.gz
tar -xzvf krustlet-v1.0.0-alpha.1-linux-amd64.tar.gz
mv krustlet-wasi /usr/local/bin/krustlet-wasi
Finally, run the following command to start the Krustlet:
--node-ip: Specify the node IP of the Krustlet. Normally, the address of the docker0 NIC is172.17.0.1, and the Krustlet that we start locally has to communicate with the Kind-started Kubernetes cluster, so we chose to bind the Krustlet program to the address where docker0 is located. on which docker0 resides. You can confirm the address of the docker0 NIC by using theip addr show docker0command.--node-name: Specify the node name of the Krustlet.--bootstrap-file: Specify the file path of the Krustlet’s temporary kubeconfig generated by the previous script.KUBECONFIG=~/.krustlet/config/kubeconfig: At the time of executing this command, this kubeconfig file has not been generated yet, Krustlet generates the private key and certificate and creates the CSR resource during the boot process. When the CSR is approved, Krustlet creates a long-lived kubeconfig file in this path, containing the key and signed certificate.
KUBECONFIG=~/.krustlet/config/kubeconfig \
krustlet-wasi \
--node-ip 172.17.0.1 \
--node-name=krustlet \
--bootstrap-file=${HOME}/.krustlet/config/bootstrap.conf
After launching Krustlet, we are prompted to manually approve the CSR request. Of course, we can also set up automatic approvals, so we won’t go into that here.
BOOTSTRAP: TLS certificate requires manual approval. Run kubectl certificate approve instance-2-tls
Execute the following command to manually approve the CSR request. We only need to perform this step when Krustlet starts for the first time, after which it will save the required credentials.
kubectl certificate approve instance-2-tls
Then view the node and you can see that the Krustlet node has been successfully registered to the Kubernetes cluster.
# kubectl get nodes -o wide
NAME                          STATUS   ROLES                  AGE     VERSION         INTERNAL-IP   EXTERNAL-IP   OS-IMAGE                         KERNEL-VERSION    CONTAINER-RUNTIME
krustlet                      Ready    <none>                 30s     1.0.0-alpha.1   172.17.0.1    <none>        <unknown>                        <unknown>         mvp
krustlet-demo-control-plane   Ready    control-plane,master   4m17s   v1.21.14        172.18.0.2    <none>        Debian GNU/Linux 11 (bullseye)   5.19.0-1030-gcp   containerd://1.7.1
Looking at the node information, its architecture shows wasm-wasi and the node has the kubernetes.io/arch=wasm32-wasi:NoExecute and kubernetes.io/arch=wasm32-wasi:NoSchedule taints on it. We need to specify that this taint be tolerated when we create the Pod in order to schedule it on the Krustlet node.
# kubectl describe node krustlet
Name:               krustlet
Roles:              <none>
Labels:             beta.kubernetes.io/arch=wasm32-wasi
                    beta.kubernetes.io/os=wasm32-wasi
                    kubernetes.io/arch=wasm32-wasi
                    kubernetes.io/hostname=instance-2
                    kubernetes.io/os=wasm32-wasi
                    type=krustlet
Annotations:        node.alpha.kubernetes.io/ttl: 0
                    volumes.kubernetes.io/controller-managed-attach-detach: true
CreationTimestamp:  Tue, 29 Aug 2023 02:55:19 +0000
Taints:             kubernetes.io/arch=wasm32-wasi:NoExecute
                    kubernetes.io/arch=wasm32-wasi:NoSchedule
Unschedulable:      false
Lease:
  HolderIdentity:  krustlet
  AcquireTime:     Tue, 29 Aug 2023 02:55:49 +0000
  RenewTime:       Tue, 29 Aug 2023 02:55:49 +0000
Conditions:
  Type        Status  LastHeartbeatTime                 LastTransitionTime                Reason                     Message
  ----        ------  -----------------                 ------------------                ------                     -------
  Ready       True    Tue, 29 Aug 2023 02:55:49 +0000   Tue, 29 Aug 2023 02:55:19 +0000   KubeletReady               kubelet is posting ready status
  OutOfDisk   False   Tue, 29 Aug 2023 02:55:19 +0000   Tue, 29 Aug 2023 02:55:19 +0000   KubeletHasSufficientDisk   kubelet has sufficient disk space available
Addresses:
  InternalIP:  172.17.0.1
  Hostname:    instance-2
Capacity:
  cpu:                4
  ephemeral-storage:  61255492Ki
  hugepages-1Gi:      0
  hugepages-2Mi:      0
  memory:             4032800Ki
  pods:               110
Allocatable:
  cpu:                4
  ephemeral-storage:  61255492Ki
  hugepages-1Gi:      0
  hugepages-2Mi:      0
  memory:             4032800Ki
  pods:               110
System Info:
  Machine ID:
  System UUID:
  Boot ID:
  Kernel Version:
  OS Image:
  Operating System:           linux
  Architecture:               wasm-wasi
  Container Runtime Version:  mvp
  Kubelet Version:            1.0.0-alpha.1
  Kube-Proxy Version:         v1.17.0
PodCIDR:                      10.244.0.0/24
PodCIDRs:                     10.244.0.0/24
Non-terminated Pods:          (0 in total)
  Namespace                   Name    CPU Requests  CPU Limits  Memory Requests  Memory Limits  Age
  ---------                   ----    ------------  ----------  ---------------  -------------  ---
Allocated resources:
  (Total limits may be over 100 percent, i.e., overcommitted.)
  Resource           Requests  Limits
  --------           --------  ------
  cpu                0 (0%)    0 (0%)
  memory             0 (0%)    0 (0%)
  ephemeral-storage  0 (0%)    0 (0%)
  hugepages-1Gi      0 (0%)    0 (0%)
  hugepages-2Mi      0 (0%)    0 (0%)
Events:
  Type    Reason          Age   From             Message
  ----    ------          ----  ----             -------
  Normal  RegisteredNode  36s   node-controller  Node krustlet event: Registered Node krustlet in Controller
Unlike the previous example, which ran Wasm images directly in the container runtime, Krustlet only supports OCI images with media types application/vnd.wasm.config.v1+json, whereas the media types of the images we built previously were application/vnd.oci.image.layer.v1.tar+gzip. See Open Containers Initiative for details.
So we need to build the image using the tool wasm-to-oci. wasm-to-oci is a tool for publishing Wasm modules to the registry, it packages the modules and uploads them to the registry. Execute the following command to install wasm-to-oci.
wget https://github.com/engineerd/wasm-to-oci/releases/download/v0.1.2/linux-amd64-wasm-to-oci
mv linux-amd64-wasm-to-oci /usr/local/bin/wasm-to-oci
chmod +x /usr/local/bin/wasm-to-oci
Pushing Wasm modules directly to Docker Hub is not currently supported, so we’ve chosen to use the GitHub Package Registry to store Wasm modules.
docker login ghcr.io
Username:  # Github Username
Password:  # Github Token
In addition, since Krustlet is based on wasmtime to run Wasm workloads, and wasmitime does not currently support HTTP, see: WASI Proposals Support for details.
So let’s write a simple Rust program that prints Hello, World. Execute the following commands to build a new Rust project.
cargo new hello-world
Then add the following code to the main.rs file.
use std::thread;
use std::time::Duration;

fn main() {
    loop {
        println!("Hello, World!");
        thread::sleep(Duration::from_secs(1));
    }
}
Execute the following command to compile the program as a Wasm module.
cargo build --target wasm32-wasi --release
Use wasm-to-oci to upload the compiled Wasm module to the GitHub Package Registry.
wasm-to-oci push target/wasm32-wasi/release/hello-world.wasm ghcr.io/cr7258/wasm-demo-app:oci
You can see that the media types of the image are application/vnd.wasm.config.v1+json.
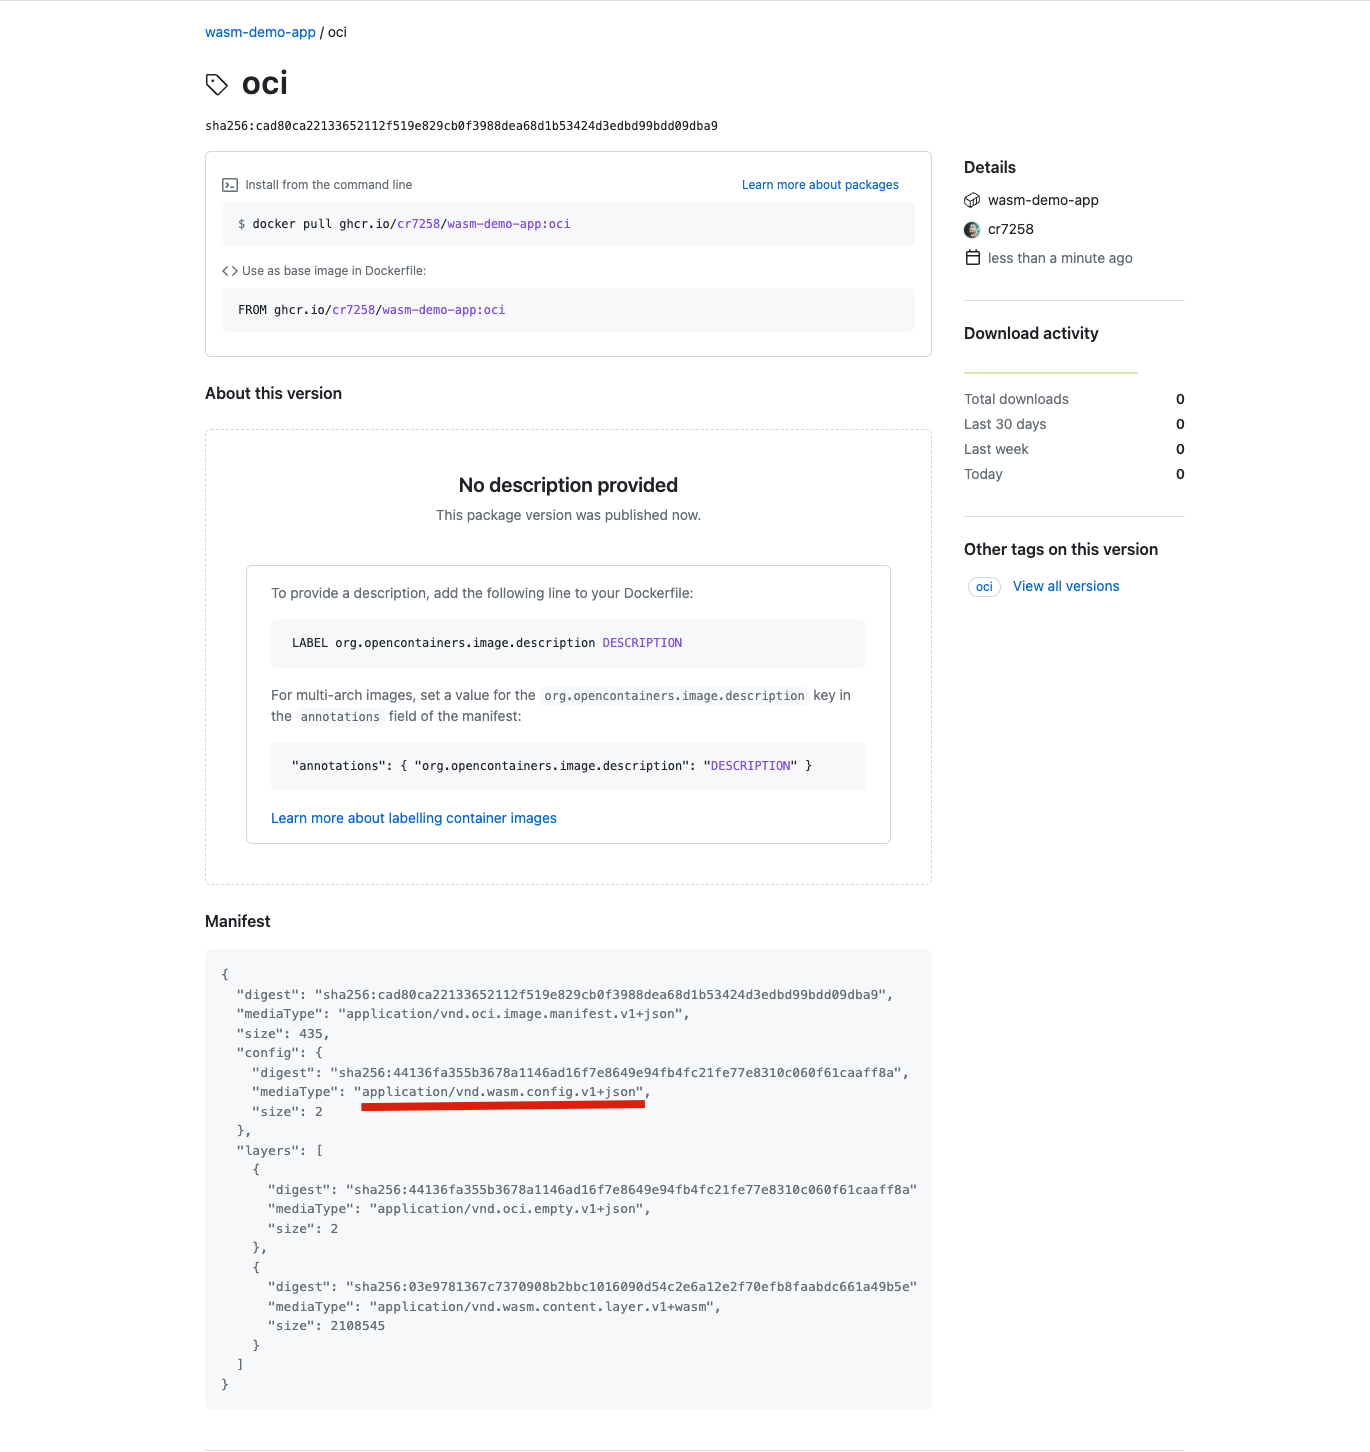
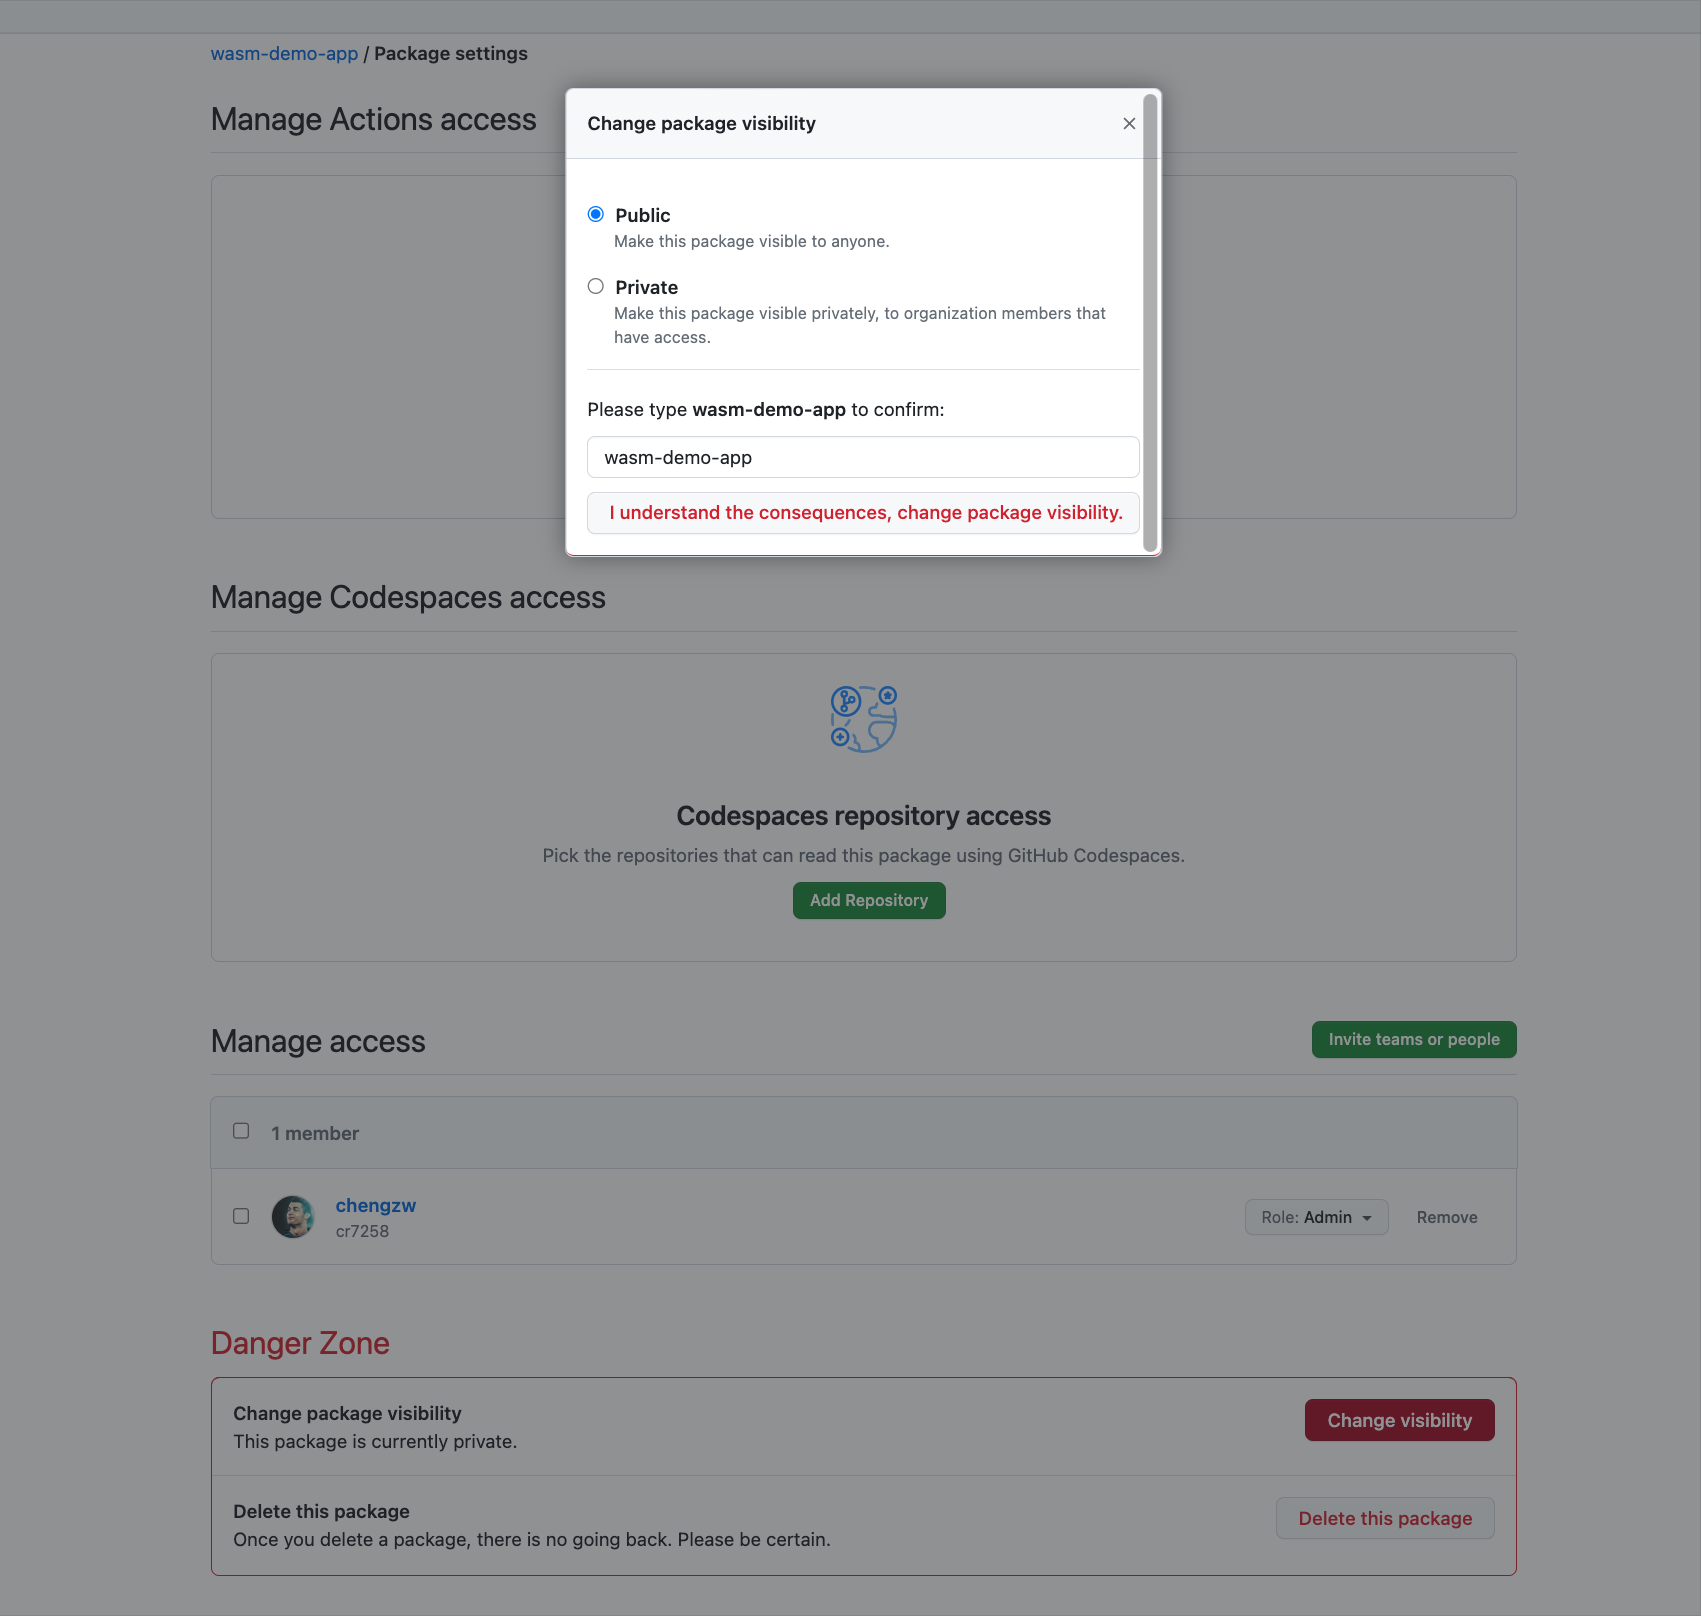
For testing purposes, we set the image to public.
Then create a Pod using that image, add tolerations for scheduling on Krustlet nodes. Since we only have one node in our Kubernetes cluster, there is no need to set a node selector.
apiVersion: v1
kind: Pod
metadata:
  name: wasm-demo-app
spec:
  containers:
    - name: wasm-demo-app
      image: ghcr.io/cr7258/wasm-demo-app:oci
  tolerations:
    - key: "kubernetes.io/arch"
      operator: "Equal"
      value: "wasm32-wasi"
      effect: "NoExecute"
    - key: "kubernetes.io/arch"
      operator: "Equal"
      value: "wasm32-wasi"
      effect: "NoSchedule"
Looking at the pod log you can see that Hello, World! is printed every 1s.
kubectl logs wasm-demo-app

Hello, World!
Hello, World!
Hello, World!
When the test is complete, destroy the cluster.
kind delete cluster --name krustlet-demo
6 Summary
This article first describes the basic concepts of WebAssembly and its advantages over traditional containers, and then introduces the process of developing Wasm applications using Rust. It then shows how to run Wasm workloads in a variety of environments, including Linux containers, Wasm-enabled container runtimes, and orchestration platforms.
The code used in this article, as well as the configuration files, can be found on my Github: https://github.com/cr7258/hands-on-lab/tree/main/wasm/runtime.
7 Appendix
7.1 About the compat and compat-smart annotations
The "module.wasm.image/variant": "compat" Annotation is used in this article to tell the container runtime that this is a Wasm workload, and crun currently supports a new Annotation "module.wasm.image/variant": "compat-smart". See: WasmEdge issue: Add crun “-smart” annotation.
When the compat-smart annotation is used, crun can intelligently choose how containers are started depending on whether the workload is a Wasm or a regular OCI container. This selection only has an impact if the standard OCI container and the Wasm application are located in the same pod. The following is a sample pod resource file containing a Wasm application and a regular Linux application.
apiVersion: node.k8s.io/v1
kind: RuntimeClass
metadata:
  name: crun
handler: crun
---
apiVersion: v1
kind: Pod
metadata:
  name: wasm-demo-app
  annotations:
    module.wasm.image/variant: compat-smart
spec:
  runtimeClassName: crun
  containers:
  - name: wasm-demo-app
    image: docker.io/cr7258/wasm-demo-app:v1
  - name: linux-demo-app
    image: nginx:1.20
7.2 Krustlet errors
The following errors may be encountered when starting Krustlet:
libssl.so.1.1: cannot open shared object file: No such file or directory
This is a problem due to incorrect location of the openssl library or not having version 1.1 or higher installed (Krustlet relies on openssl version 1.1).
7.3 WasmEdge Errors
The following error may occur when starting a container with the container runtime.
FATA[0000] failed to create shim task: OCI runtime create failed: could not load `libwasmedge.so.0`: `libwasmedge.so.0: cannot open shared object file: No such file or directory`: unknown
Re-execute the WasmEdge install command.
curl -sSf https://raw.githubusercontent.com/WasmEdge/WasmEdge/master/utils/install.sh | bash
Reference: https://www.se7enshare.cn/webassembly-zai-yun-yuan-sheng-zhong-de-shi-jian-zhi-nan/